Search results for: one page

Need a new search?

If you didn't find what you were looking for, try a new search!

The Course Creator’s Sales Funnel (Make Money Selling “Affordable” Courses)

There are many benefits to creating and selling digital courses online…

  • High margin – nearly 100% pure profit
  • Scalable – you can sell an infinite amount
  • Helpful – you can literally change people's lives with your courses
  • Boosts authority – you've probably heard the saying, “you wrote the book on it”… well, that applies to courses too, “you created the course on it”, making you an authority on the subject

I'm sure there are more benefits, but those are the biggest.

This post is will walk you through the steps to create and sell “affordable” courses. Note: if you want more step-by-step instructions, you can checkout the course here.

What's An “Affordable” Course?

Before we dive into the details, let's define “affordable”…

  • A course that's less than $300

And here are some of the pros and cons for selling these “affordable” courses…

Step 1) Plan & Create Your Course

If you don't have a course already, then you need to start here. If you already have a course, feel free to jump down to step 2.

There are a few things to take into consideration when planning your course…

  1. Audience – who is this course for? ex. Small business owners.
  2. Topic – what is the course is about? ex. Facebook ads.
  3. What type of course are you going to create?
    • Mastery level – Everything you need to know about [topic]. ex. Everything you need to know about Facebook Ads.
    • Results-based – How to [generate result]. ex. How to generate leads for your small business with Facebook Ads.

Once you've answered those questions, it's time to work on your course outline.

Creating an outline is a critical step because it…

  • Ensures your course follows a logical progression.
  • Ensures you cover all necessary topics and details.
  • Makes your life easier because you don't have to think about “what to do next”, you already know what you need to do.

The video below will show you how I go about creating my course outlines. Note: the video is from the course, so you might hear me reference some other videos, but the “meat” of the training stands on it's own. Y don't have to watch those other videos prior to watching this one!

After you've taken a few days to plan your course, it's time to actually create it.

There are many ways to create a course, but here are a few of the key tools I use for mine:

Is your course made? Great, move onto the next step!

Step 2) Sell Your Course With A Funnel

Sure, you could sell your course by setting up a sales page, slapping a PayPal button on it, and delivering it via email. Or, by using a tool like Gumroad to make it even easier… but, in my experience, the best way to sell a course is with a sales funnel…

Why use a sales funnel? A couple reasons:

  1. Funnels can increase conversion rates. On average, sales pages convert between 1-5%; however, with the proper strategy, you can dramatically increase conversion rates by bringing people through a funnel which “warms” them up before presenting the offer.
  2. Funnels can increase Average Order Value (AOV). Funnels give you the opportunity to present more offers to people as they checkout in the form of order bumps, 1-click upsells, and 1-click downsells.

Obviously, being able to sell to more people and increasing the amount they spend is something we all want to do… right?! Well, a funnel is the best way to do it!

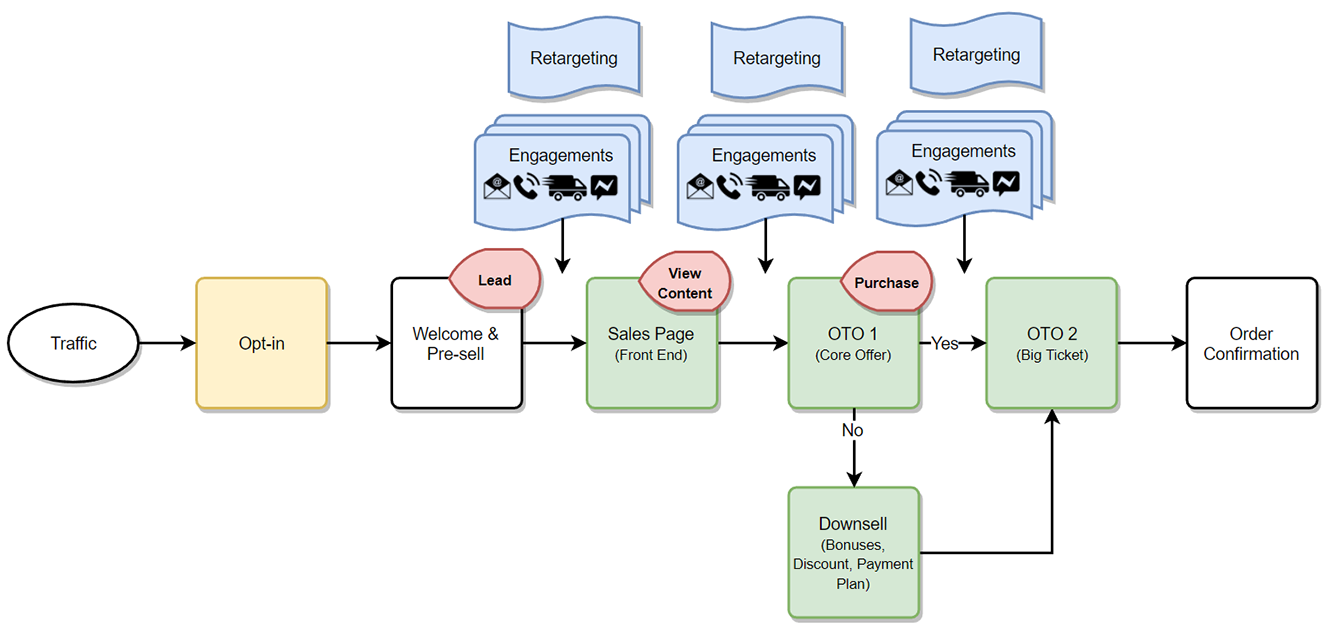
Let's examine the parts of the funnel:

1) Squeeze Page

The “Squeeze Page” is designed to capture someone's contact information in exchange for a Lead Magnet. Having someone's contact information gives you the opportunity to follow up with them and build a relationship.

A Lead Magnet is something of value that your potential customers want. It can be a checklist, cheat sheet, flowchart, or even video training.

Ideally, you'll be able to use a resource (pdf, doc, etc.) or even a training video from your course, as your Lead Magnet.

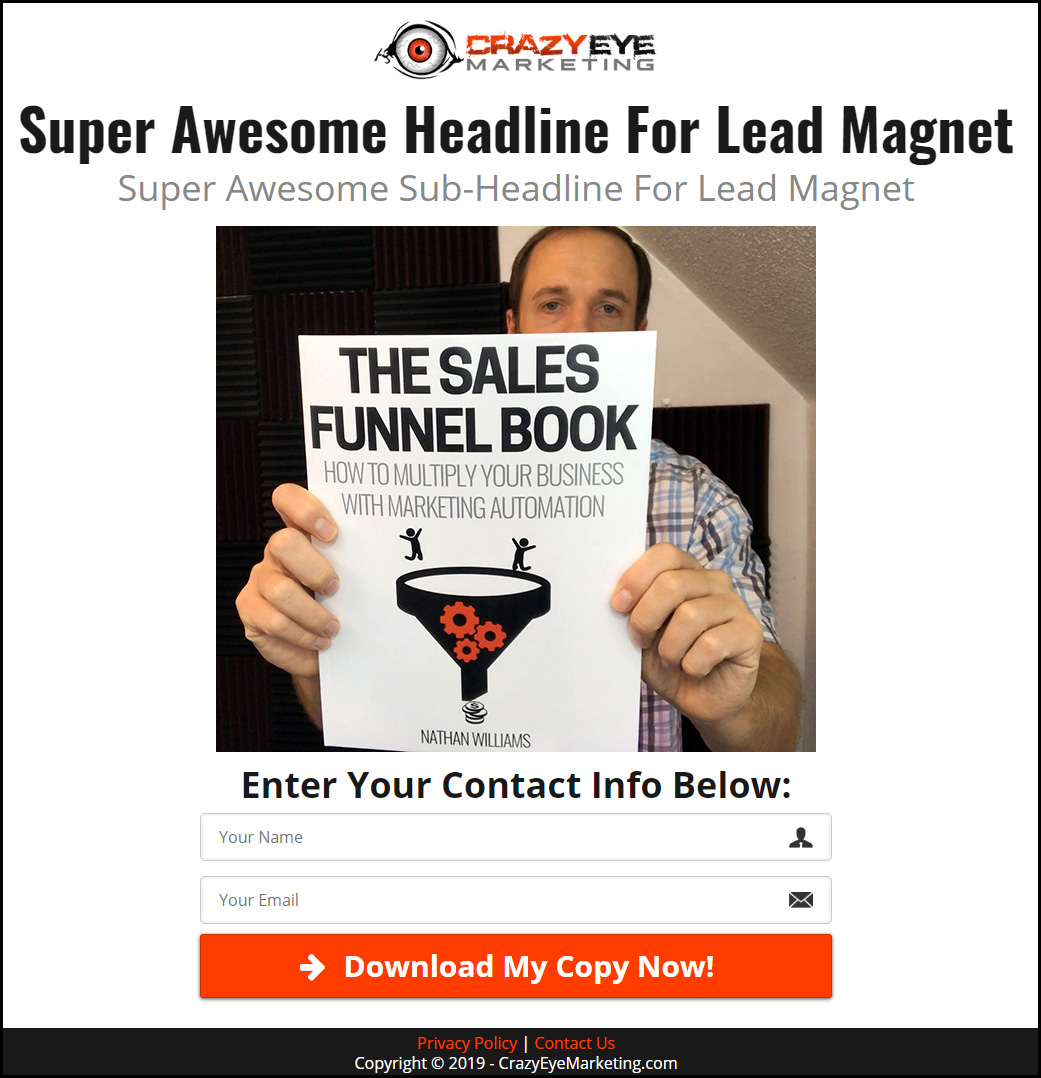
From my experience, having a very simple squeeze page with a headline, possible sub-headline, and a picture of the offer, tends to convert better than something “fancy” with a lot of details.

This is my top converting squeeze page format:

2) Welcome and Pre-Sell Page

The Welcome and Pre-Sell Page is the page an individual lands on after they request your Lead Magnet.

There are 2 courses of action you can take on this page…

Course of Action #1: Pre-Sell

For this CoA, I recommend having a short 1-5 minute video that does the following…

  1. Congratulates them on requesting the lead magnet and tells them it will land in their inbox in the next few minutes. Also, remind them to check the spam folder if they don't see it.
  2. Confirm the lead magnet will help them with X, Y, and Z, but…
  3. It's just one piece of the puzzle. If they really want to get to the next level… you have a special offer for them on the next page! (you can end the video here if you want, or you can keep going…)
  4. Who, What, When, Where, Why, and How…
    • Who needs this special offer? Call out your audience. Makes sure people are in the right place… this special offer is for small business owners looking to drive more leads.
    • What is the special offer? It's a step-by-step video course on [topic] with dozens of resources and flowcharts, supportive community, and a 30 day money back guarantee.
    • When is the special offer? You can gain instant access right now at this introductory price; however, the price will go up in the near future.
    • Where is it? On the next page!
    • How to get it? Click the button below… (you can end the video here if you want, or you can keep going…)
  5. Here's what our customers are saying about the course… scroll through testimonials, reviews, and real world results.

Course of Action #2: Teach

In this CoA, you're not going to go straight into selling.

Instead, you're going to deliver the Lead Magnet right on this page, so they have instant access.

Then, teach a lesson on the Lead Magnet – how it relates to them and how to use it so they can get the most out of it. This training will be as long as you need – from 3 minutes to 90 minutes and anything in between is perfectly fine here.

During the training, you want to soft-sell and tease your course. Basically, highlighting the fact that the Lead Magnet isn't “everything” and there's more stuff they can learn from you.

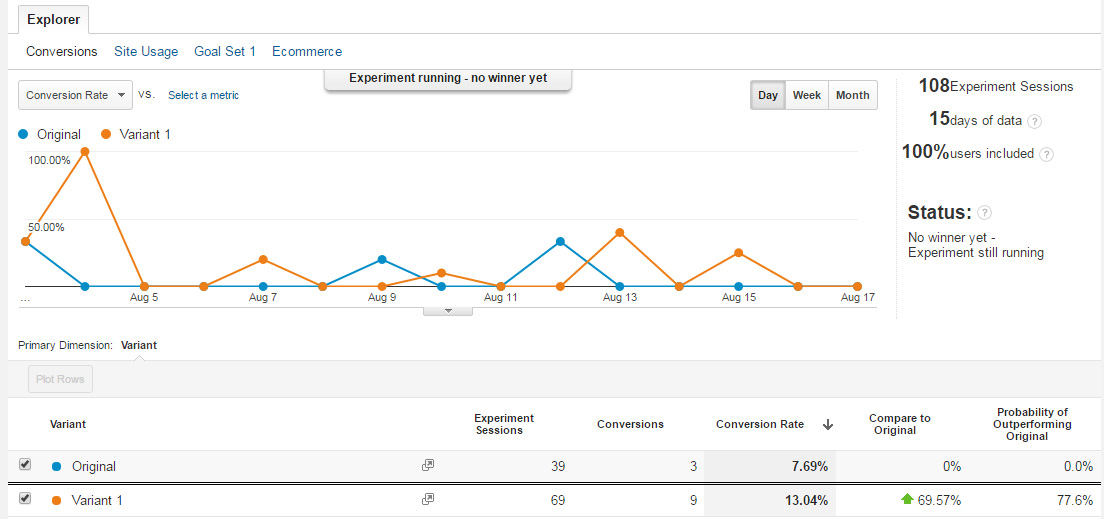
I highly recommend split-testing these two CoAs.

The Page

Here's what my typical Welcome & Pre-Sell page looks like:

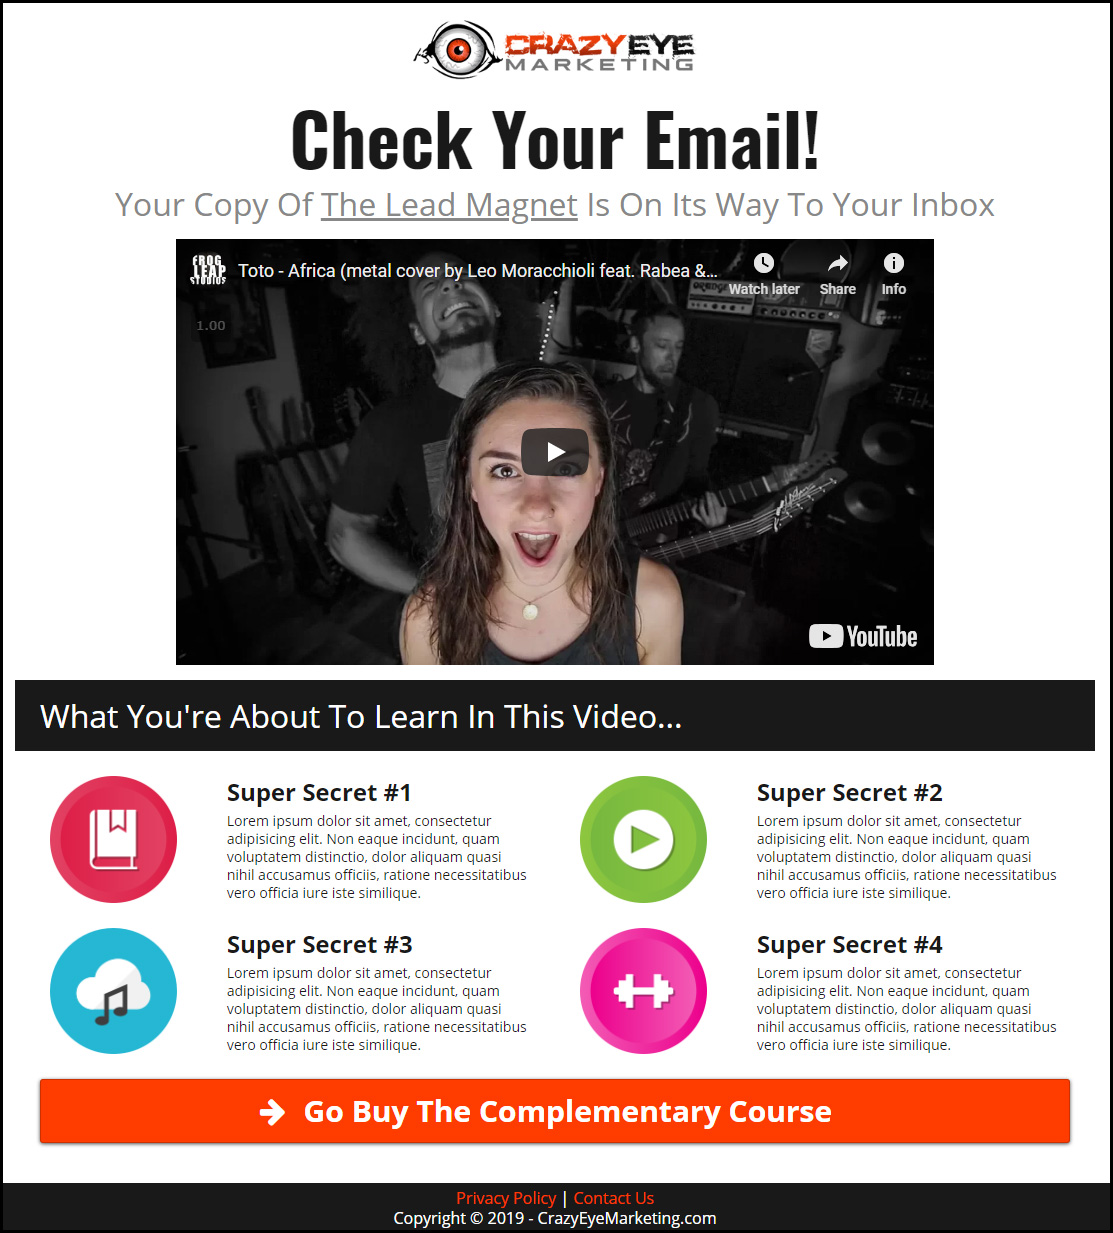
The content on the page is pretty self-explanatory, so I won't bore you with those details. Below the video, you may want to have a few bullet points that highlight the key points covered in the video, just in case someone would rather read than watch.

3) Sales Page

The Sales Page is the page where you sell your course. (obviously!)

While you've certainly seen thousands of sales pages in your lifetime, you may have never created one.

To help you understand the underlying principles of a sales page, here's a breakdown of the common elements most sales pages have:

  • Headline – Only job is to capture attention
    • Ex. How to get [benefit] without [pain].
  • Subheadline – Clarify headline, share main benefit of the offer
    • Ex. Title of your course. (or vice versa, use the title of your course as the headline with the formula as the subheadline)
  • Image – You will likely have a bunch of images on your sales page; however, the very first one should be focused on grabbing attention
  • Video – You can use a video instead of an image. In the video, cover the…
    • Who – Who are you and who is your course for?
    • What – What do you have to offer?
    • Why – Why should someone want what you’re offering? Scarcity!
    • How – How to get what you’re offering?
  • Lead Copy – Brief paragraph that pulls the individual into the rest of your sales page
  • Trust Signals – Social proof, testimonials, “as seen on”, etc.
  • Longer Copy – What you’re actually selling. Features, benefits, description of offer (what they get, bonuses, payment options, etc.), etc.
    • For courses, I breakdown all of the individual lessons and share their benefits
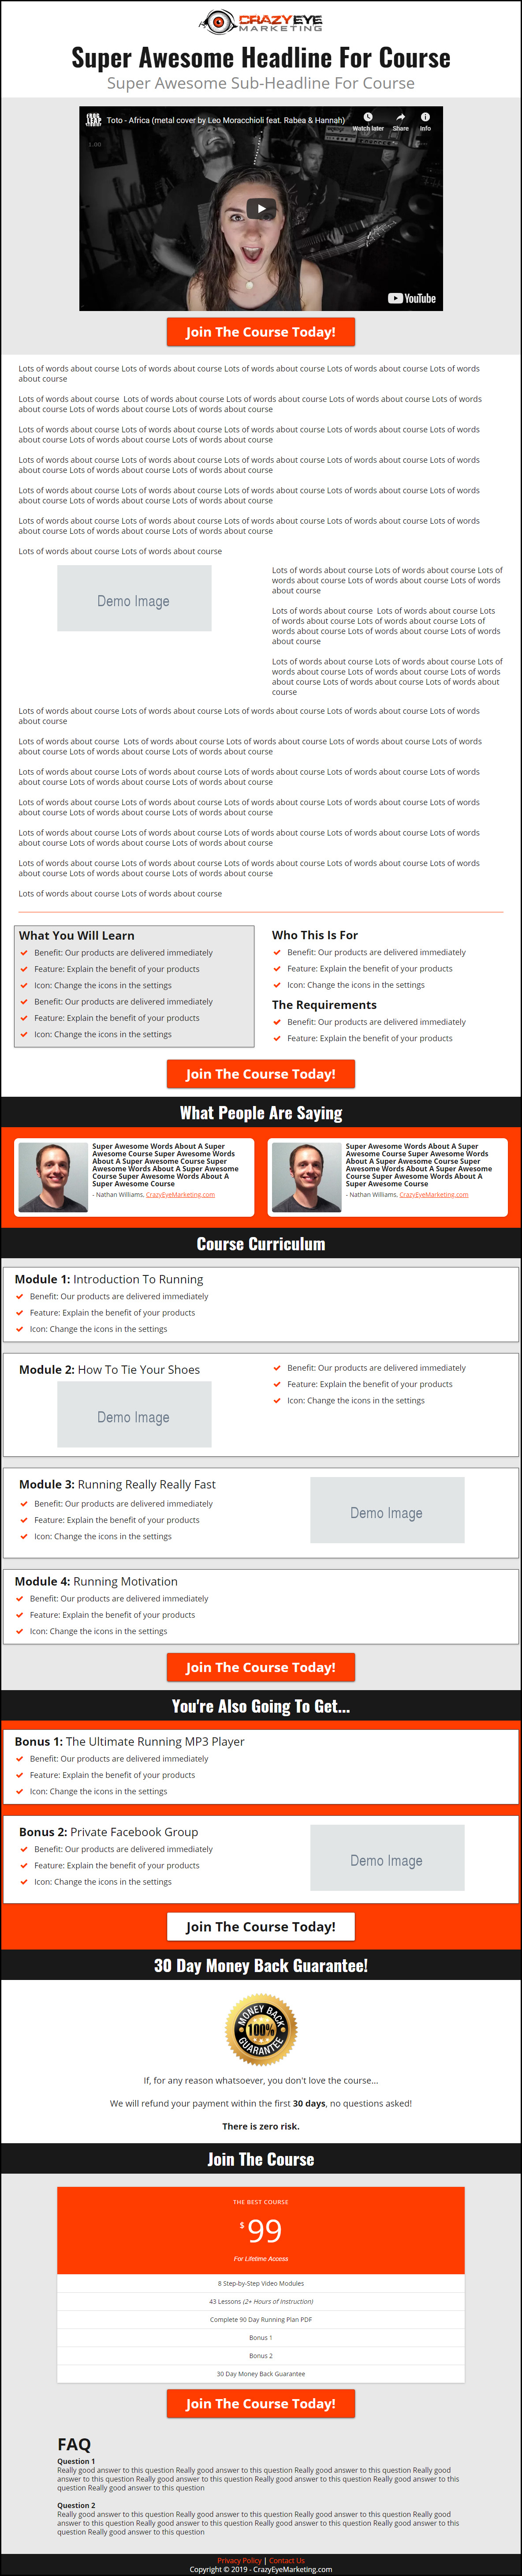
  • Call To Action (CTA) – How to get it

Here's what my typical Course Sales Page looks like:

Example Sales Page for Online Courses

4) Order Form Page

The Order Form Page is where the individual enters their payment information, selects their payment option (if there are any), and actually buys your course!

Here's my typical Order Form Page:

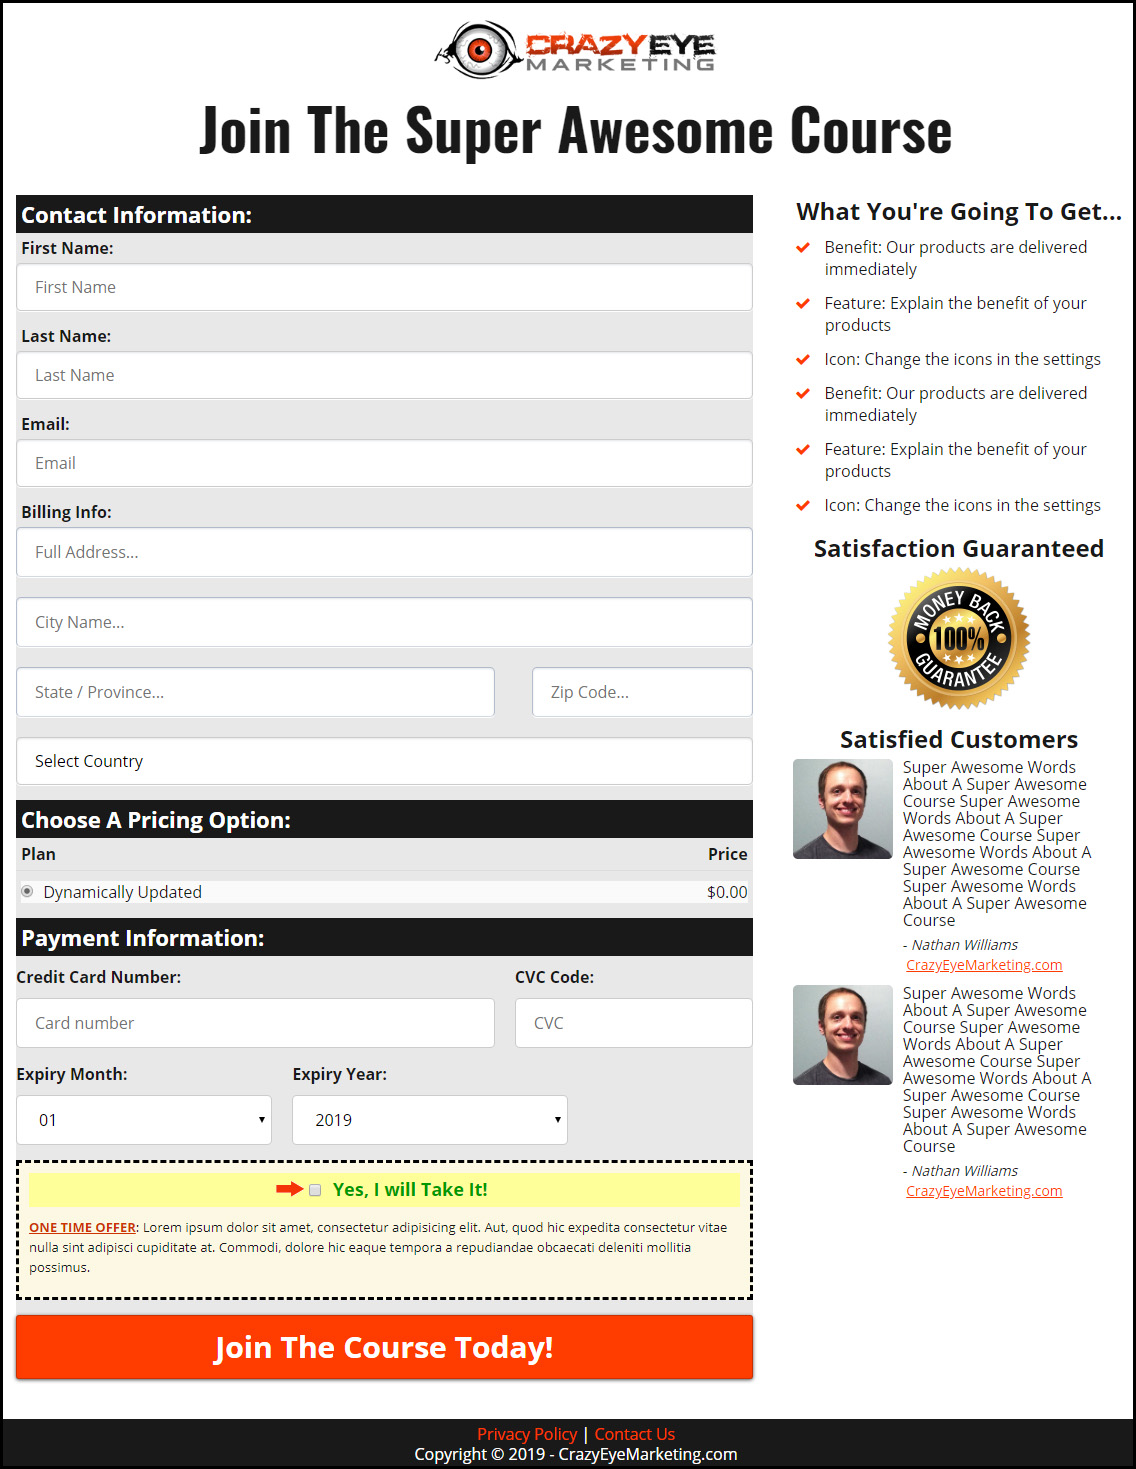
I believe the elements on it are pretty self-explanatory. I'll cover the key ones briefly…

  • Re-confirm they're about to purchase the correct product
  • Highlight your guarantee
  • Include more social proof
  • Request their payment information
    • Note: Even though you don't need their physical address because they're buying a digital product and you're not shipping them anything… I still recommend asking for that information because it reduces fraud.

5) OTO Page

The One-Time-Offer (OTO) page is the page immediately after the order form page.

This page presents another offer to your customer in the form of a 1-click upsell. (by clicking “Yes, I Want It!”, the customer can upgrade their order with the offer on the OTO page)

This offer should complement the course they just purchased from you. Some good options are:

  • Coaching/Support – 1-on-1 call, group coaching, etc. / one-time or recurring
  • Something Extra – Another plan, calculator, tool, etc. that will help the individual achieve their goal
  • Another Course – Another course you have that your customer might also be interested in

Here's what my typical OTO page looks like…

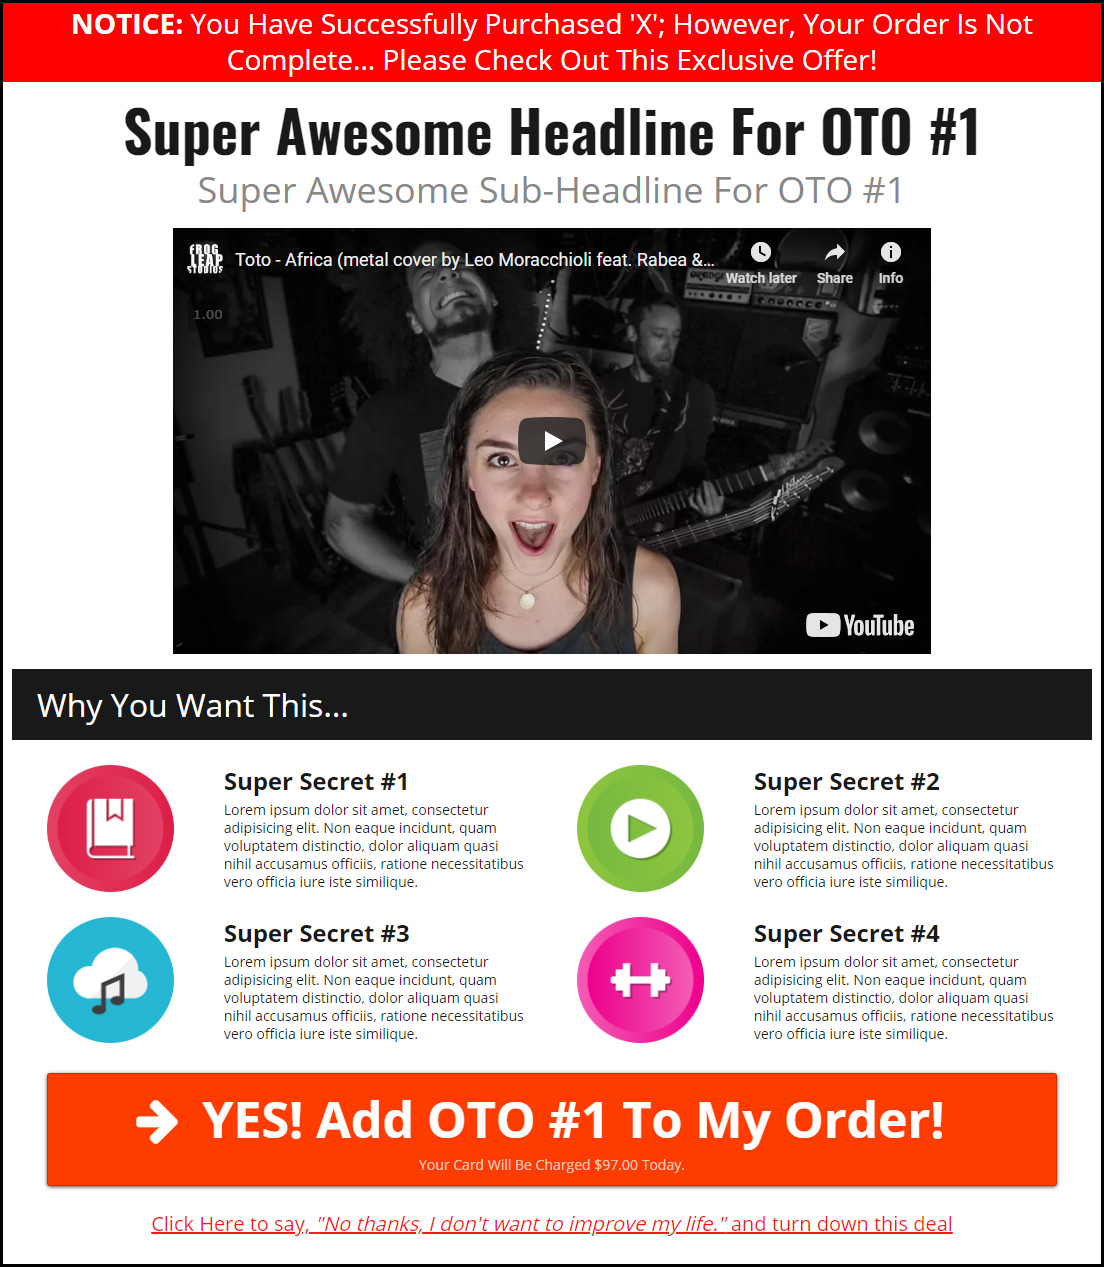
It looks quite similar to the “Welcome and Presell” page, right?! Why? That page structure works!

To breakdown some of the elements on this page:

  • The page starts with a notification to let people know they've purchased the course; however, their order is incomplete and they have a chance to upgrade their order.
  • Then, there's a headline and sub-headline, just like all the other pages. Same concept here.
  • The video should be short, about 2 minutes or less. People are wanting to get into the course and aren't very patient on this page so don't overwhelm them with too much information. The general flow of the video is:
    • Congrats on buying the course, it will help you with X, Y, and Z!
    • Now, if you want to take it to the next level, you'll want to also grab [OTO] as it will do A, B, and C!
    • I normally charge $197 for it, but on this page only, it's $97! That's 50% off!
    • Click the button below to add it to your order!
  • Include a few simple bullets that highlight the details outlined in the video.
  • Have a big, giant, 1-click upsell button and a “No” Link.

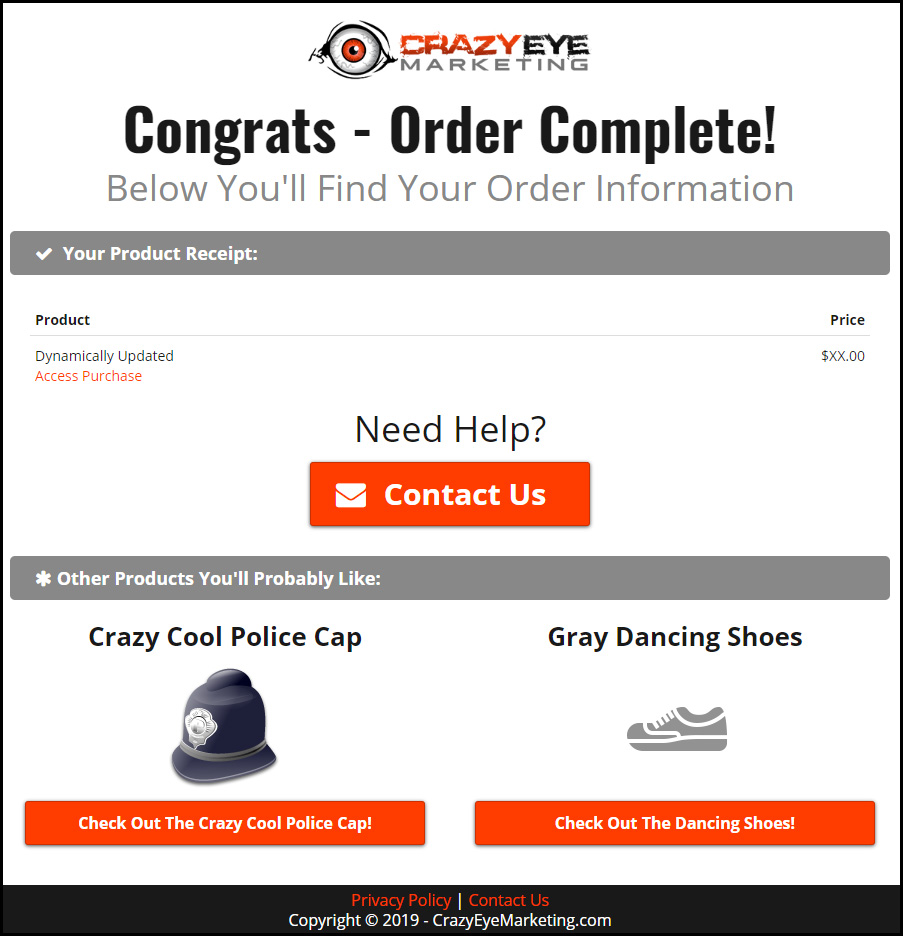
6) Order Confirmation

The Order Confirmation Page is the final page your customer lands on after purchasing your course and hopefully your OTO.

It simply confirms their order, gives a summary, tells them how to access their purchase and support, and possibly contains links to other offers you sell (Offer Wall).

Here's my typical Order Confirmation Page…
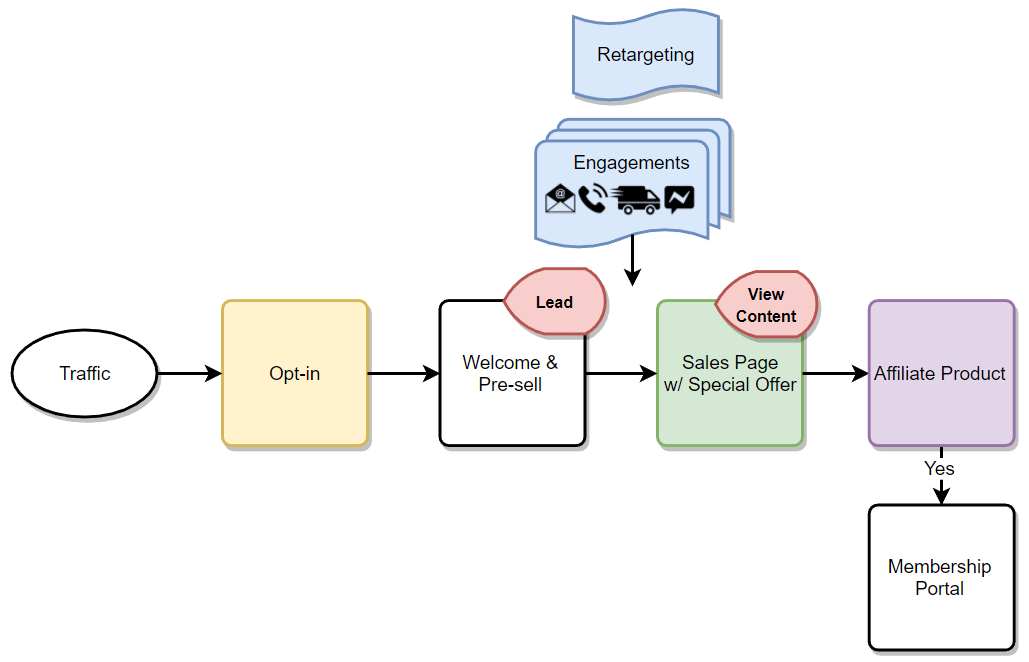
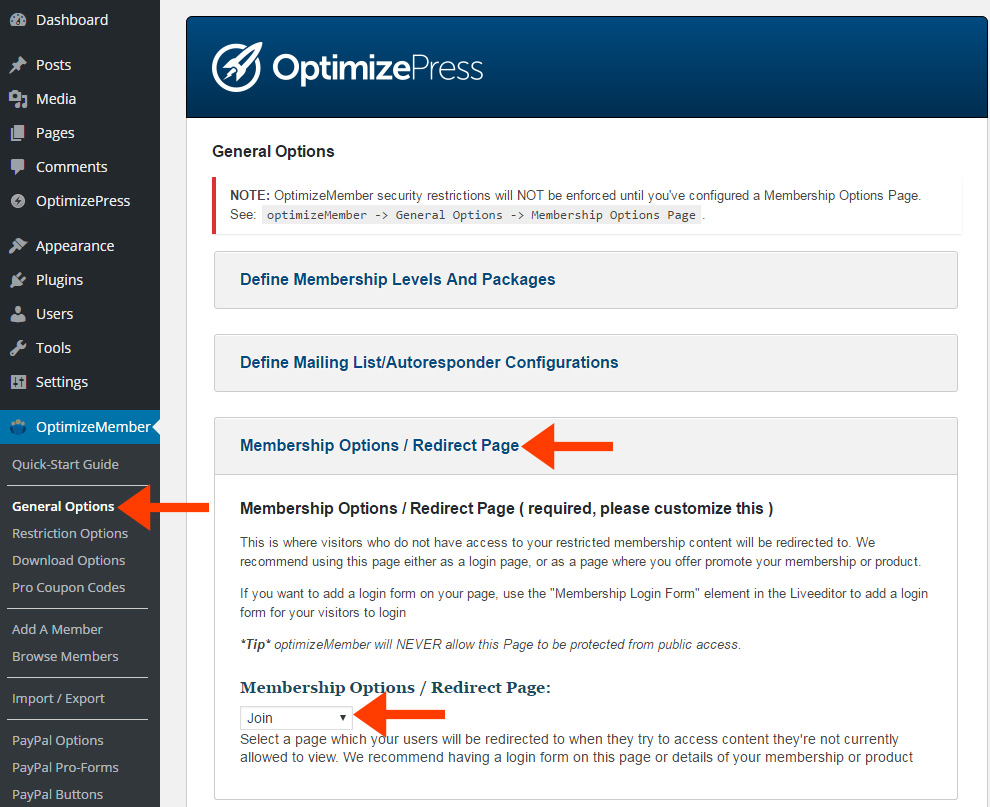
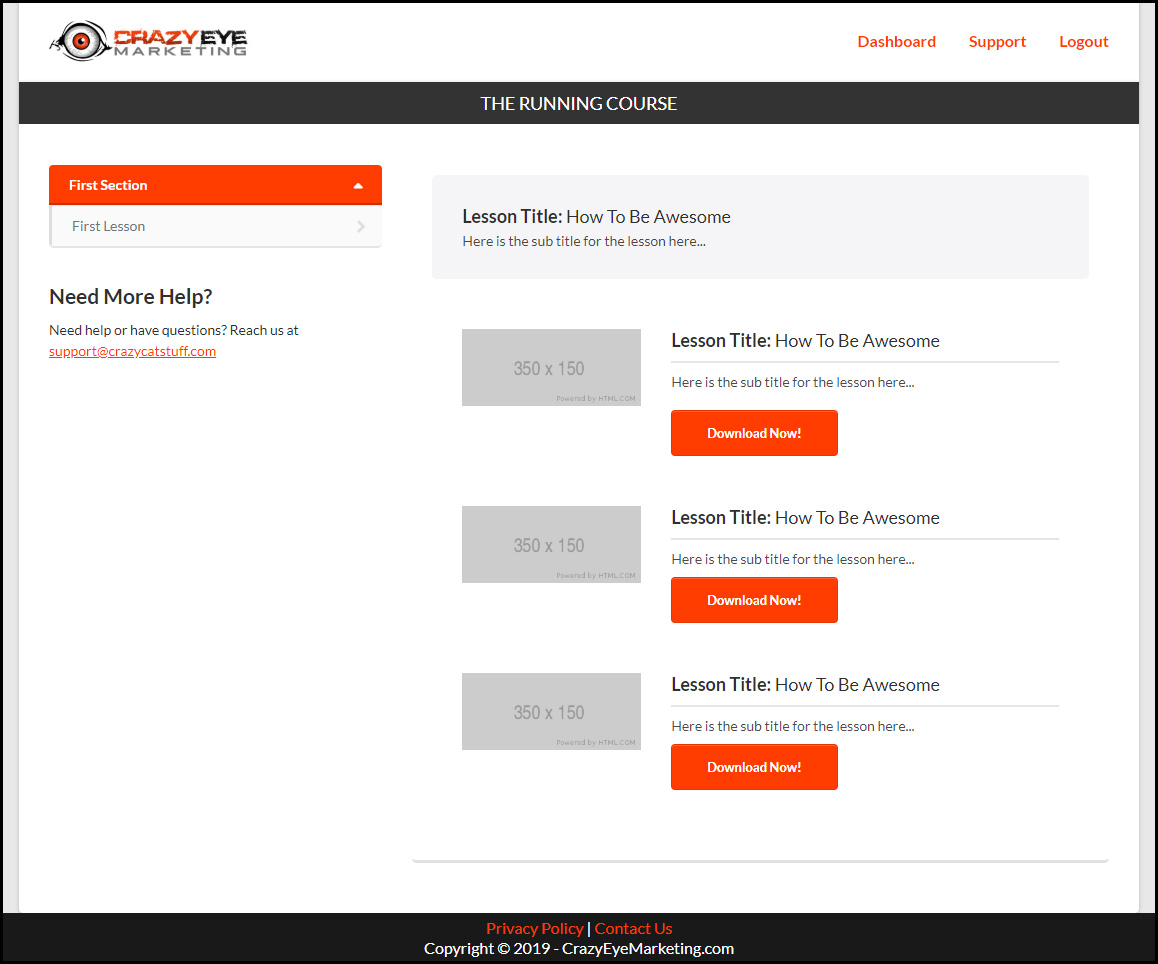
7) Membership Pages

The funnel also includes the Membership Pages.

The first is the Membership Access page. It lets people login and/or create an account…

Then, the second page is the Membership Area.

This is where you have your course.

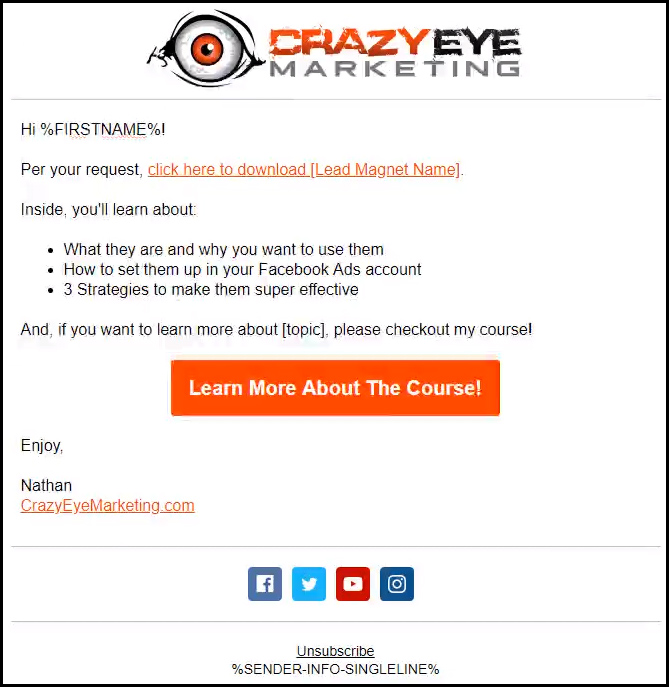
8) Lead Magnet Delivery Automation

The first automation in your funnel is the “Lead Magnet Delivery” automation.

This is a simple automation that delivers the lead magnet you're offering on your squeeze page.

There are 3 primary elements of this email:

  1. A link to the promised resource
  2. A reminder of why they requested the resource and some reasons to go check it out right now
  3. A subtle Call-To-Action (CTA) for your course

Here's what my typical “Lead Magnet Delivery” email looks like…

9) Video Delivery Pages & Emails

After delivering the Lead Magnet, you should wait a day before beginning to drip high quality content to your lead.

What is “high quality content”?

My recommendation is a video training series and/or other resources that prove you know what you're talking about while simultaneously getting people to know, like, and trust you. All the while, subtly promoting your course.

If you're familiar Gary Vaynerchuk's, “Jab, Jab, Jab, Right Hook” concept… this is what you're doing here.

The Video/Resource Content

Here are a few ideas for the video/resource content you can send to people:

  • First few videos of your course. Think of it like a “free trial”.
  • Use select videos from your course. If you have certain videos that can stand on their own and provide really valuable insight, you can use them as your content.
  • New videos that teach the overarching strategy/theme. For instance, create new videos that teach the “what” of each section of your course – ie. for a course about creating courses, one video could be about course planning, one on course creation, one about the funnel, one about marketing automation, and so on. Basically, teaching people the concept of your course, while not telling people “how” to actually do it. (they need to buy the course to get the “how”!)

The Video Pages

While you can host your videos on public sites like YouTube and Vimeo, I would not recommend sending people to either of those sites to actually watch your videos.

Instead, create unique pages for each video and embed the video on those pages.

Here's my typical video page:

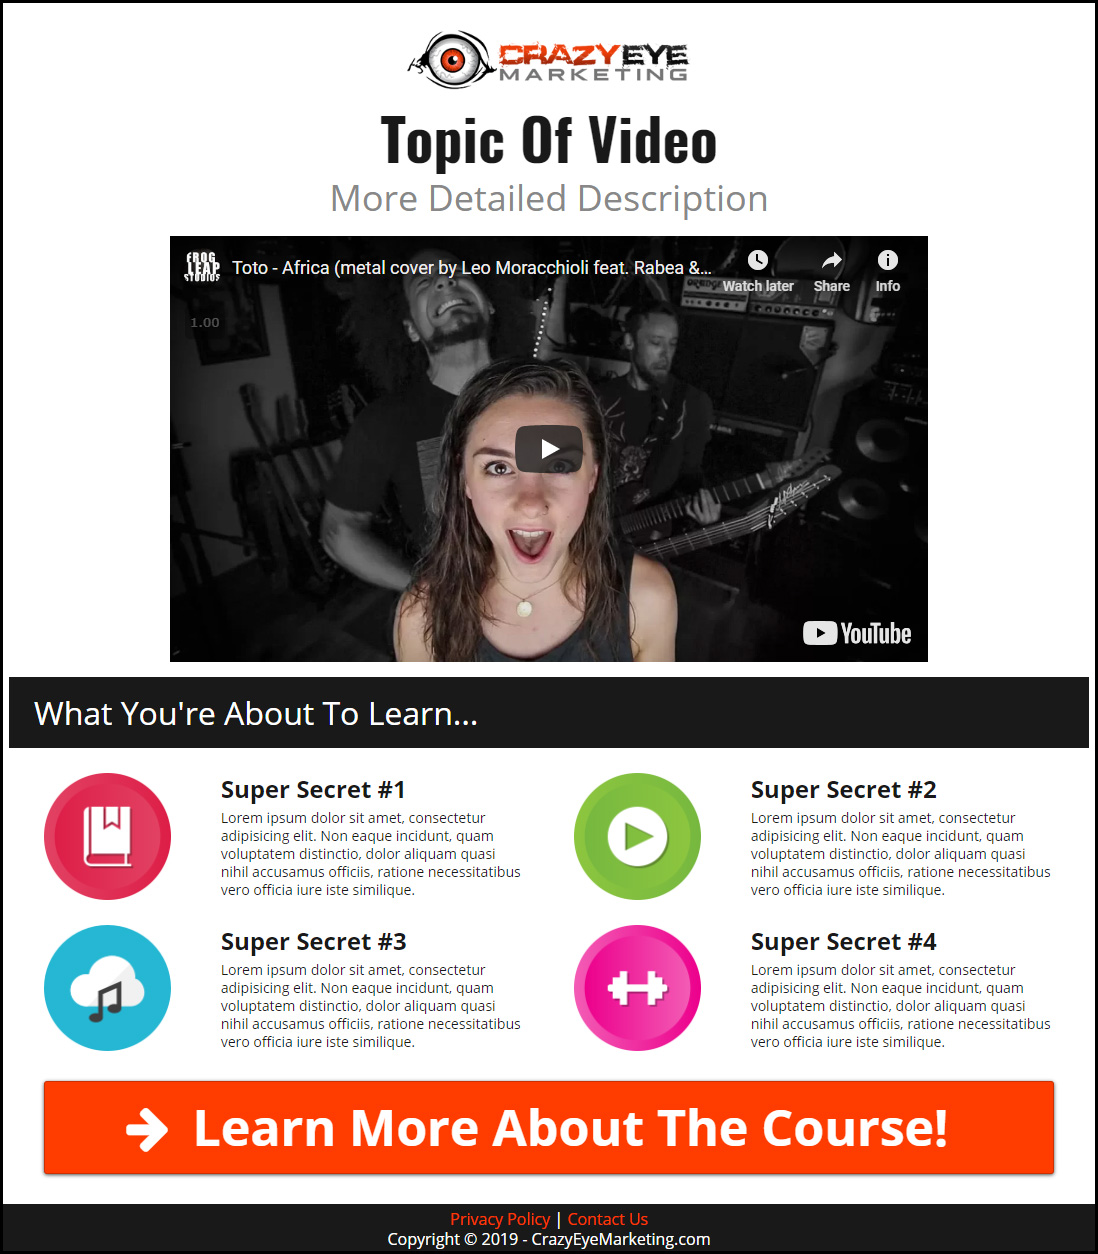
Say what?!?! That page looks just like the Welcome and Presell and OTO pages!!!

Yes. Yes it does.

Again, if it ain't broke, don't fix it.

Obviously, on this page you have the topic of your video as the headline/subheadline, the video will be your training video, the bullets will outline what they're going to learn in the video, and the big CTA button will take them to your course's sales page. Simple.

The Video Delivery Emails

To get people to watch your training videos, you'll primarily use email marketing. (you could also get fancy with retargeting, but that's beyond the scope of this article)

Here's my typical email:

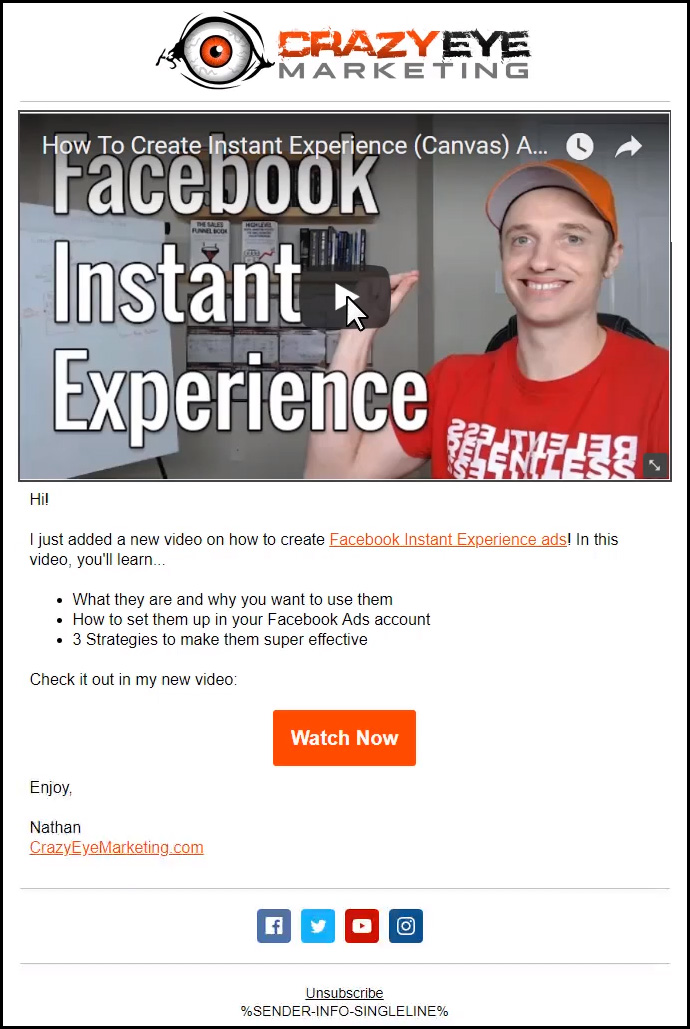
It's a pretty simple and self-explanatory email; I'll just outline it really quickly…

  • Include a screenshot of the video with a super-imposed “play” button on it. When the person clicks on the image that looks like a video, they'll be taken to your video page where they can watch it.
  • Include a short description of the video with a few bullets outlining what they'll learn. Recommend having a text link somewhere in the written description.
  • Include a button with a link to the video page.

The Order Confirmation Email

The Order Confirmation Email is sent to your customers.

It contains information on how to access their purchase:

The content of the emails is self-explanatory; however, it should be dynamic and only present access information to the products/services the customer purchased.

3) Send Traffic

After creating your course and building a sales funnel to sell it, it's time to find some people to buy it… it's time for some traffic!

Of course, there are many ways to send traffic, but in this section we're going to focus on Facebook traffic because it works very well for selling digital courses.

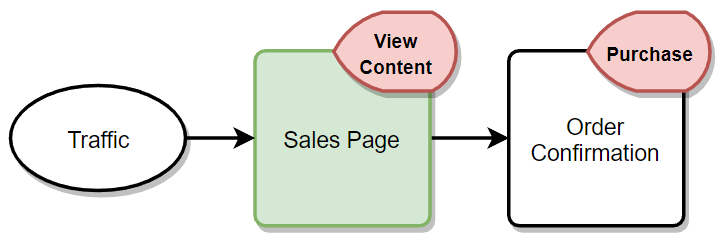
If you refer back to the funnel diagram above, you see there's really only two places we're going to send traffic for this particular funnel. (of course, you can get more advanced with it, but let's get the basics down first!)

You should spend 90-95% of your budget, sending traffic to your Squeeze Page… you need to get people on your lists! Note, there are two lists here, your email list and your retargeting list. This way, even if they don't opt-in for your Lead Magnet, you still know they're interested in your particular topic. Once they're on your retargeting list, you can recommend other Lead Magnets they may be interested in (if you have them) or go straight into promoting the course.

The remaining 5-10% of your budget will be spent on your retargeted traffic – people that have engaged with you already. You want to direct this traffic directly to your course's sales page.

That's the core of the ad strategy for this funnel. It's pretty simple, but works amazingly well when you have a Lead Magnet and course people actually want!

Ad Copy 101

No matter whether you're sending traffic to your Squeeze Page or Sales Page, the basic ad copy strategy remains the same.

This video gives ya the basic ad copy strategy to apply to your ads:

4) Scaling Your Business

Congrats on launching your course! That's a big accomplishment and more than most people will ever do!

Now that you're armed with one course, it's time to think about scaling your efforts.

There are two ways to scale…

  • Out – Create more courses that complement the course you just created. For example, I have a course on creating courses. In that course, I briefly cover ClickFunnels, ActiveCampaign, and Facebook Ads. What I can do now is create more detailed courses on those various tools, so if people want to learn more… they can!
  • Up – Create more expensive courses/resources to sell. Offer done-for-you services or other, complementary services. Offer coaching/consulting. Create a Mastermind group.
  • Up & Out – Create more complementary courses AND offer more products/services that are more expensive, but provide more value to your customers.

Everything in this section should be pretty obvious, but I wanted to make sure you realized creating one “affordable” course probably isn't going to be enough to change your whole life. However, by scaling your efforts out and/or up, the sky is the limit on how much money you can make!

Build A Course & Funnel

I hope you learned a lot from this post.

I really tried to lay out the entire plan for creating and selling “Affordable” courses.

Having said that, if you would like to learn all the nitty-gritty technical details and to get a copy of the Course Creator's Sales Funnel…

I have a course for you!

Click here to learn more about the course!

The Course Creator’s Sales Funnel (Make Money Selling “Affordable” Courses)2019-03-13T00:39:59+00:00

HELP!! No one’s buying my stuff! Here’s how to craft Irresistible Offers people buy!

You have a product or service you want to sell…

So, you setup a website or sales funnel to try and buy it, but…

No one is buying it!

It sucks. But, I believe everyone who has ever tried to sell something has run into this problem… so, you're not alone.

This post serves as a guide to help you troubleshoot your problems so you can start to generate sales!

3 Thing To Look At / Think About

There are many reasons why people do and don't buy things; however, most (if not all) can be handled by focusing on 3 key areas:

  1. Introduction – How a prospect is introduced to your product/service
  2. Framing – The benefit/result your product/service provides
  3. Offer – Your product/service wrapped up in a nice, pretty box

These 3 key areas should be thought about in order AND all at once. Let me explain…

The Introduction is important because you need make a good first impression; however, depending on your Offer, your Introduction may change to better suit what you're going to try to sell the individual.

The point is, each area is critical and you need to focus on all 3 individually, but you must think about them holistically (big picture) as well. If you don't, your results won't be as good as they can be!

1) Introduction

The Introduction is where you think about the Customer Journey:

The Customer Journey

Where, on their journey, are they when they come across your product/service? (Note: from now on, instead of typing “product/service” each time, I'm just going to say “widget”, but I mean both products and services).

  • Are they aware they have a problem?
  • Are they aware there's a solution out there?
  • Are they aware of your widget?
  • Are they looking for widgets to buy?
  • Are they considering your widget?

Where they are in their journey will impact how you Introduce your widget.

If the individual has no idea they have a problem, then you can't scream, “Buy my widget!” at them – it's not going to work.

Conversely, if the individual is actively comparing widgets, screaming “Buy my widget at a discount!” might do the trick.

Also, you really need to consider your widget and align it with the Customer Journey. For example, if you sell a $10k coaching package, or even a $1,000 coaching, package for that matter – your prospect is going to need to know, like, and trust you before they hire you as a coach. Maybe they're aware they need coaching and they're aware of what you have to offer; however, they're trying to decide between you and two other coaching (Evaluation). What could you do, at this level of the Customer Journey, to move them onto the next level? Maybe a complimentary coaching call?

The point is, you may need to create other “widgets” to “sell” first, so they continue to move down the Customer Journey funnel with you and buy your “final” widget.

For example:

  • Content – blog posts, videos, podcasts, etc. that generate awareness and position you and your business as an authority
  • Lead Magnets – freebies in exchange for contact information. Usually PDFs, videos, coupons, etc.
  • Consultation – hop on a quick call to see if you'll be a good fit for each other
  • Cheap(er) Widget – a more affordable widget before purchasing more expensive widgets

To quickly summarize the Introduction section, you need to think about where your potential customer is in their Customer Journey and where your widget fits in. Then, you may need to backwards plan how to move the person through the Customer Journey by “selling” other “widgets” prior to them buying your “final” widget.

2) Framing

As previously mentioned, people buy and don't buy things for all types of reasons…

Some reasons are logical, while others are based on emotion.

Logical

Logical reasons are often results driven and “make sense”.

  • Results – I want X. Product Y will help me get X.
    • I want a hole in my wall. A drill will help me make a hole in my wall.
    • I want to get better at Facebook Ads. Nathan's Facebook Ads course will help me do that.
  • Makes Sense – There are “good” reasons to buy Product Y.
    • Cheaper
    • Faster
    • Stronger
    • Higher Quality
    • High Value

Emotional

They say, most purchases are driven by emotions first, then backed by logical reasoning, so it's important to consider people's emotions as you frame your widget.

For example, you probably don't need to drive a Ferrari to pick up lunch from Chipotle… but, people do. Why?

  • Cool
  • Fun
  • Fast
  • Makes Me Feel Like I “Made It”
  • Make People Envy Me

Your objective now is to identify all of the Logical (results & makes sense) and Emotional reasons an individual would buy your widget. You then address each reason as you promote your widget!

3) Offer

The third step is to convert your widget into an offer.

A product or service is NOT an offer… and offers are what people buy.

So, what is an offer?

An offer is your product or service + everything else that comes with it…

  • Guarantee
  • Payment Option(s)
  • Scarcity
  • Other Benefits
  • Bonuses (HUGE!)

By “offeratizing” your widget, you're able to dramatically increase it's perceived value (make people think it's worth more), which will make selling it much easier!

Guarantees

Your widget should come with a guarantee of some sort. Whether it's a simple money back guarantee, a double your money back guarantee, lifetime guarantee, a guarantee your widget will save X amount of time, etc….

The point is, you should have a guarantee of some sort for your widget.

Payment Option(s)

If your widget is big and expensive, you probably want to offer payment plan options to make paying for it more reasonable.

Alternatively, if you have a cheaper product, but people might want to buy multiple quantities; you could incentivize the purchase of greater quantities by offering price breaks. For example, buy 1 get 1 for 50% off.

Scarcity

Is your offer going away soon? Is the price about to increase? Are you about to stop taking new clients?

If there's a reason someone should act now, make sure you address it!

Other Benefits

Does a percentage of your profits go to help a charity?

What are you doing with the money people are giving you? If you're giving back to the community, make sure you let people know!

Bonuses (HUGE!)

Bonuses are important!!!

There have been many times when people buy a widget simply because they want the bonus that comes with it! I recently purchased a YouTube Ads tool… not because I wanted the tool, but I wanted the course that came with it!

Frank Kern also uses a lot of insane bonuses which often “push” me over the edge!

Bonuses can make or break your offer!

Here are a couple ways to add bonuses to your offer:

  • Create multiple formats.
    • Ex. If you're selling a book, make sure you have a digital version, audio version, video version, abridged version, etc.
    • Ex. If you're selling videos, include a written version and/or checklists and other handouts to improve your offer
  • Include additional widgets that enhance your original widget.
    • Ex. Other resources and courses if you're selling software, training, coaching, or even physical products. By adding digital products to physical product offers, you can dramatically increase your offer's perceived value with very little effort!
      • Ex. If you're selling a first aid kit, you could also include an ebook of 51 life saving skills.
        • Pro tip: Create multiple formats of your bonuses (ie. a video version) to really increase the perceived value!
    • Ex. Batteries if you're selling something electronic.
    • Ex. Free coaching session(s) with purchase of high-end training.
    • Ex. Free or expedited shipping if you purchase $X amount of product or within Y amount of time.

Coming up with bonuses shouldn't be too difficult either… simply think about the problems your widget creates!

For example:

  • If you sell a training on one topic, it's going to open the door to dozens of other topics. For instance, I sell a course on ClickFunnels. It's a great course that teaches people everything they need to know about building sales funnels… but, then my student needs traffic (problem!). So, I have a training course on traffic, which opens more doors to more topics, and so on.
  • If you sell a flashlight, what problems will it create for people? Batteries, light bulbs, insurance/warranty if it breaks, etc.

No matter what you sell, it's going to create more “problems” for people and you can use these “problems” to help you generate ideas for bonuses and additional offers!

Putting It All Together

After analyzing your Introduction, Framing, and Offer, you want to incorporate your discoveries with ALL of your marketing efforts…

  • Your ads will target and speak to people based on where they are in their journey.
  • You may bring people to different “widgets” first to help move them through their journey OR you may take people directly to your offer.
  • Your widget's sales page and follow up will hit on the logical and emotional reasons people want your widget.
  • Your sales page will outline your entire offer and all its bells and whistles.

As you can tell, the information uncovered by going through these three steps will be used throughout your entire marketing effort…

By doing a good job and really evaluating everything, it will surely help you sell your stuff!

HELP!! No one’s buying my stuff! Here’s how to craft Irresistible Offers people buy!2018-12-07T20:58:53+00:00

5 Ways To Start Making Money Online TODAY Even If You Have Nothing To Sell

It happens a few times a week…

Some poor guy or gal sends me an email because they've heard of the magical power of Sales Funnels and they want to start building them, but…

They don't have anything to sell.

I then spend about 10 minutes writing them a reply on the various ways they could start selling products and services TODAY.

And, well – I'm tired of spending 10 minutes, 3-5 times a week, writing essentially the same thing…

Plus, I know if I'm getting that many emails with the `same question, there are probably 10X that number of people who aren't emailing me.

This post is to serve you.

5 Ways To Start Making Money Online TODAY Even If You Have Nothing To Sell

First things first, this is not an “end all, be all list” – there are more than these 5 ways to start selling something today.

So, if you don't like what I'm about to show you – that's fine. Try something else, it won't hurt my feelings.

However, I've used these 5 methods MANY times and know from personal experience they work and can prove to be incredibly lucrative.

1) Start Drop Shipping

Drop shipping is a model where you don't have to hold any inventory, yet you're able to offer hundreds to thousands of products.

How? Here's an example:

  • You go to a site like AliExpress or work directly with a manufacturer
  • You find a product you think people will like
  • You list that product on an ecommerce store, or within a sales funnel 😉 and markup the price
  • When someone buys the product, you take that money, buy it from the manufacturer, and ship it directly to your customer – pocketing the difference

Pros Of Drop Shipping

  • Low startup costs – You can literally list products for free
  • Low risk – Since there aren't many costs associated with it, you don't have much to lose
  • You keep the customers – When someone buys a product, they buy it from you/your business. You get their information and can form a rapport with them

Cons Of Drop Shipping

  • Highly competitive – Since there aren't any real costs associated with it, anyone can do it. But, don't let this discourage you, simply do it better!
  • Low margins – Comes back to competition. You're not offering anything unique, anyone can offer the same product you are. It can wind up as a race to the bottom unless you're careful, strategic, and make yourself the best option
  • Inventory syncing & management – It can be a massive headache to keep track of what is/isn't in stock and when prices change

The Drop Shipping Sales Funnel Model

The sales funnel model you will likely use to offer drop shipping products is what I call the “Front End” or “Classic” sales funnel model, and it looks like this:

Finally, I've written an extensive post on how to start drop shipping with AliExpress that can be found by clicking here.

2) Design Clothes And Other Items

In this day and age, you can print anything you want onto shirts, jackets, hats, socks, pillows, phone cases, shoes, dresses, towels, mouse pads, purses, backpacks, and more!

You also don't need to keep any inventory on hand. Simply upload your graphic to a print-on-demand website like Printful or Pillow Profits and violà, you have yourself a product to sell!

Pros Of Print-On-Demand

  • Reasonably low startup costs – All you really need are designs and a website to sell them through
  • Low risk – Since there aren't many costs associated with it, you don't have much to lose
  • Upsells are pretty easy – Place the graphic on different items. For example, if they buy a shirt, they may also want a hat with that same design

Cons Of Print-On-Demand

  • Coming up with a winning design can be difficult, especially when you don't have an audience/list available to poll
  • Unless you're a designer, expect to spend a few hundred to a few thousand dollars to get high quality designs
  • It's very easy for people to rip off your designs and then undercut you

The Print-On-Demand Sales Funnel Model

You'll likely use the same sales funnel model that's outlined in the drop shipping section above.

3) Take Advantage Of PLR And MRR

PLR stands for Private Label Rights and MRR stands for Master Resell Rights.

These are white label digital products like eBooks, guides, video training, and even software that you're able to slap your name on and sell as your own.

That's right! One minute you don't have anything to sell and the next, you've “published” an eBook!

Pros & Cons Of PLR And MRR

The pros and cons list for PLR and MRR are pretty much the same as drop shipping with a couple exceptions… incredibly high margins and no inventory management.

Since PLR/MRR are digital products, there's no cost of goods, which means it's pretty much 100% pure profit! Then, of course, since it's digital, you don't have to worry about inventory, selling out, or anything like that… there's an “infinite” amount.

Beyond that, selling PLR/MRR is incredibly competitive because it's easy, quick, and very low cost to get started. It's OK tho, that just means you need to find a way to stand out – and here are a few ways to do so:

  • Changing the cover and title of the PLR/MRR product. This way, at least it looks different than what's out there
  • Rewrite the PLR/MRR product and place your own spin on it. This can be a lot of work; however, it can pay off tremendously in the end
  • Include other, complementary products and resources with the PLR/MRR you're selling

The PLR/MRR Sales Funnel Model

To sell your PLR/MRR products, you will likely use the same Front End sales funnel model that's outlined in the drop shipping section above.

Simply put, it's the best sales funnel model for selling “cheaper” products (<$50).

Find PLR/MRR To Sell

There are a TON of sites that sell PLR/MRR, but my favorite is MasterResellRights.com.

It offers a massive selection of PLR/MRR for only $19.97/month (hint: join for 1 month, download what you need, then cancel)

4) Offer Productized Services

A productized service is a set service that's sold for a set amount.

There's very little interaction and negotiation.

For example, I'll cut your grass for $40. You spend $40 and are left with a nice, freshly cut yard.

Need some productized service ideas? Checkout fiverr.com, there are hundreds of thousands of them! By browsing through fiverr, I'm confident you'll find a handful of productized services that you can also offer.

Pros Of Productized Services

  • You can start offering a productized service this very second, there is nothing holding you back
  • Repeat customers are quite easy, unless you mess up the first time
  • It's easy to upsell. You can offer more of what they purchased, faster delivery speeds, enhancements, complementary productized services, etc. The possibilities are endless.

Cons Of Productized Services

  • You're exchanging time for dollars… unless, you outsource the workload!
  • It can be very competitive for simple tasks, so you need to have a unique value proposition (UVP). One of the simplest UVPs is to be the fastest. Most people who purchase productized services want that service accomplished yesterday. By being the fastest (while still providing quality, of course), you will stand out!

Tip To Getting Started

Most people will not purchase a productized service from you unless you have proof you can deliver what you promise.

When you're first getting started, you probably won't have much proof. To change this, offer your service for free in exchange for a review/testimonial and as work you can include in your portfolio.

Once you have proof, the sales will come much more easily!

The Productized Service Sales Funnel

The Front End sales funnel outlined in the drop shipping section above is the perfect funnel model for offering productized services because there are so many upsell opportunities.

However, if you don't want to get that complex, sticking with a simple sales page funnel can still yield amazing results:

5) Sell Other People's Products

If you don't have your own products to sell and you don't want to find one (drop shipping, PLR) or make one (productized service, clothing), you can always sell someone else's and earn a commission for making the sale.

Think about a car salesman for a second. He doesn't own the car he's trying to sell you, and he definitely didn't make the car. Yet, he's still trying to sell you the car and when he does, the car manufacturer “thanks” him by giving him a commission.

Why can't you do the same thing the car salesman is doing? Probably not with cars, but can't you help some other business try and sell their products?

Sure ya can! In Internet speak, it's called affiliate marketing.

Affiliate Marketing's Bad Rap

I want to address this real quick because I've seen people turn up their nose the second I mention “Affiliate Marketing”…

Affiliate marketing gets a bad rap because individuals blindly spam promotions for affiliate products without knowing a thing about the product or the customer they're trying to reach. They're selfish and chasing commissions which leads them to do sketchy things.

If you think about it, in any industry you'll find sleazy salesmen. It's just with affiliate marketing, it's so cheap to promote affiliate offers that sleazy salesman can spread the sleaze on a grand scale with ease…

But, you don't have to be a sleazy affiliate marketer.

You can be a good salesman that cares about the products you're offering and the customers you're offering them to.

It's your decision.

Pros Of Affiliate Marketing

  • It's easy and costs nothing to start
  • All you have to do is make the sale. You don't have to run customer support, deliver the product, or anything like that

Cons Of Affiliate Marketing

  • While you may be the one to get the customer to purchase the product, they're not your customer… unless, you make them so! (read the sales funnel section below)
  • You don't control the offer, commission, etc. If the seller decides to stop selling the product, or stops offering affiliate commissions, or changes your commission… there's nothing you can do about it. You're at the mercy of someone else. The key here is to promote multiple affiliate offers so you're diversified and not dependent upon one offer for your livelihood

The Affiliate Marketing Sales Funnel

When it comes to promoting affiliate offers, you probably don't want to send individuals directly to the sales page… instead you will want to use a Bridge Funnel:

A Bridge Funnel allows you to re-frame the affiliate offer and incentivize it with bonuses.

For example, let's say I want to promote ClickFunnels as an affiliate. It's a product I use, believe in, and feel good about recommending.

I could simply send you a link to register for ClickFunnels… and, maybe that works OK.

But, if I used a Bridge Funnel and incentivized you registering for ClickFunnels by offering you over $1,000 in free training and resources, you'd probably be more apt to sign up for a ClickFunnels account. Right?

Then, to claim your free training and resources,  you'll have to forward me your receipt and I can enter you into my database as one of MY customers. So, not only am I going to increase sales by offering bonuses, I'm able to turn people into MY customers too!

A Few Popular Affiliate Networks

Many companies offer an affiliate program, so if you have a product you want to be an affiliate for, simply Google: [product name] affiliate program. If that doesn't work, message the company to see if they offer one.

Here are a few of the most popular affiliate networks:

  • Amazon Associates – sell any product on Amazon and earn a commission
  • Clickbank & JVZoo – really big affiliate networks with mostly digital products and huge commissions. Some of the offers on these networks are spammy/scammy seeming, so use good judgement
  • CJ & ShareASale – I find both of these platforms kind of hard to use; however, they offer a wide selection of products that you can promote

In Closing

There you have it…

  1. Drop Shipping
  2. Print-On-Demand
  3. PLR & MRR
  4. Productized Services
  5. Affiliate Products

… 5 ways you can start making money online TODAY even if you have nothing to sell!

There's no reason why you can't get started!

5 Ways To Start Making Money Online TODAY Even If You Have Nothing To Sell2018-10-09T10:07:31+00:00

An Honest SamCart Review

Being that I spend all day, every day, building sales funnels … I'm always checking out new tools to make my life easier.

I first heard about SamCart over a year ago; however, within the last few months they've done some massive promotions and I decided to give it a shot.

After playing around with it for a few weeks, I've come to the following conclusion:

I wouldn't recommend SamCart in its current form and price point of $99/mo for most people. (I would pay $20/mo in its current form)

[as of 20SEP2016] 

It really hurts me to say that because I like what Brian Moran (founder) has done in the past and I really wanted to love this tool, but I can't.

The only time I might recommend it is if you are a complete beginner. If you've never put together a website, never setup a shopping cart, never setup any kind of payment processor, never done anything technical – SamCart might be a good fit for you because it's super simple to use.

This simplicity is probably why I don't really recommend it because it makes me feel like my hands are tied when I know there are other tools that are less restrictive, albeit they're more complex.

Having said that, I have high hopes for the future of this tool and believe it will be top-notch six months from now.

Why I Can't Recommend SamCart Right Now

1) No Page Builder

You are forced to use pre-designed templates, something I absolutely hate.

Having to cram my marketing message into a pre-determined box drives me freakin' nuts and makes me feel like a caged animal.

For this reason alone, I can't recommend SamCart right now.

Plus, you have almost ZERO say in what goes into the up-sell pages … they give you one video, a text box, and wish you luck.

Fortunately, they're adding a page builder.

2) Limited Cart Abandonment Functionality

Cart abandonment is a big deal; the latest results from the Baymard Institute found the average cart abandonment rate to be 68.63%. [source]

While you can manually setup cart abandonment functionality by hosting an alternate sales page elsewhere and then using SamCart to process the payments, it's a “sloppy” setup and not one I like doing, unless absolutely necessary.

By not having this functionality built-in, SamCart is directly hurting a business' bottom line.

Fortunately, they're fixing this.

3) You Can Only Offer 2 Payment Options

You're only able to offer 2 payment options to your customers.

This may not be a limiter for businesses offering digital products because they don't typically need more than two payment options.

But, for businesses that offer physical products, this is a huge limitation.

Here's why – one of the products I was trying to add was a supplement and the business wanted to give customers the option to buy 1, 2, and 3 months worth with varying price breaks.

Unfortunately, since SamCart only allows 2 payment options, we weren't able to set it up how they wanted.

Of course, we could offer greater quantities on the up-sell pages; however, this was not ideal in this particular situation.

4) Limitations On How Quantity Is Presented

Like #3 above, this deals more with physical products.

Customers are able to order more than one product at a time; however, they make their selection based on a simple drop-down menu where they can select to order 1 thru 10.

This selection method is way too simple and businesses should be afforded more control.

For example, what if I had bundles of 1, 3, 5, and 10? I wouldn't want someone to select 4 because it would mess up my flow and possibly result in two separate shipments of 1 and 3.

Also, I feel I should be able to offer price breaks based on these quantities. Unfortunately, I cannot with SamCart.

5) Poor Digital Asset Delivery

The digital asset delivery feature for SamCart is super simple.

You upload a file to their system, if someone buys it, a download link is presented to them …. and that's it.

There's minimal personalized experience. No membership area. Nothing. Just a, “Here's your file, thanks.”

Of course, this can be circumvented by using an integration with a membership platform (which you probably want anyway); however, at $99/mo … I'd expect more. Even a super simple membership portal would be better than what they currently have.

6) Lackluster 3rd Party Tracking (Google Analytics & Facebook Ads)

Tracking is absolutely critical for successful marketing.

While the built-in tracking SamCart offers is great, what it offers for 3rd parties is poor.

They don't currently support Ecommerce tracking within Google Analytics – and it doesn't look like that's going to change anytime soon.

Facebook Ads tracking is also poor; they don't offer the option for dynamic values, ie. how much someone spent. What if they selected one payment option over the other or a different quantity? What if they checked the Order Bump box? You won't be able to tell this via Facebook tracking which means you won't be able to properly assess ROI from ads. Ouch!

Also, the up-sell pages don't have unique URLs which makes creating custom audiences based on pages viewed, dang near impossible.

7) Zapier Integration?

Zapier integration is a must. I'd say 9 out of 10 funnels I build utilize Zapier in one way or another.

While SamCart doesn't “officially” integrate with Zapier at this time (they will soon), there is another way …

Why I Have High Hopes For SamCart

1) They're Fairly Receptive To User Input

They're looking for user feedback and appear to actually act on it: https://samcart.uservoice.com/

2) It's Very Easy To Use

SamCart is super easy to use. Pretty much anyone with a computer, the Internet, and something to sell could list a product online within as little as 30 minutes.

3) Their Blog Articles & Resources Are Top-Notch

They're constantly publishing in-depth articles on their blog at http://blog.samcart.com/. This shows me they know what they're doing and have a full understanding of the “hows” and “whys” a shopping cart platform can and should help a small business.

Also, their webinars and other Lead Magnets are full of useful information, whether you use SamCart or not.

4) They're Growing Fast!

The popularity of the SamCart platform has exploded in the last few months. With this increased popularity comes more money and resources … typically resulting in a better end product for the consumer.

In Closing

While I can't recommend SamCart in its current form and price point, I think within 6 months time, it's going to be a really solid platform. I look forward to seeing how it progresses!

An Honest SamCart Review2016-10-14T18:29:05+00:00

How To Split Test LeadPages Drag & Drop Page Builder

A few months ago, LeadPages launched their drag & drop builder.

It's a fine tool, granted they should have had a page builder eons ago instead of forcing people to cram their marketing messages into pre-built templates … but, that's a moot point.

They have a page builder now and it lacks one core feature – the ability to conduct split tests.

This post will show you how to split test the pages you build using the LeadPages' page builder.

Related article: How to build your own landing page platform

Step #1: Build Your Pages

You need at least 3 pages in order to properly conduct a split/multivariate test:

  1. Version A (Original)
  2. Version B (Variation 1)
  3. Thank You Page

Both, versions need to “land” on the same Thank You Page upon successful opt-in.

If you don't have these pages built already, build them now.

Step #2: Add Google Analytics To Pages

If you don't have a Google Analytics account already – go get one.

Now, snag your Google Analytics tracking code. You can find it under “Property”, “Tracking Info”, and “Tracking Code”.

It looks like this:

Google Analytics Tracking Code

Head over to LeadPages and open one of your three pages in the editor.

On the left hand side,  click the option for “SEO & Analytics”, then select the “Analytics” tab.

In the “Head Section Tracking Code” text box, paste in your Google Analytics tracking code:

Add Google Analytics Tracking Code To LeadPages

Don't forget to save your changes and click “Update”!

Add the Google Analytics code to the rest of your pages.

Step #3: Create A Goal In Google Analytics

In order for Google Analytics to keep track of your split test, you need to tell it what your goal is.

In the case of squeeze pages, the goal is usually the Thank You Page; the only way for someone to land on a Thank You Page is by opting in.

So, you need to tell Google Analytics that a goal is reached when someone lands on your Thank You Page.

In your Google Analytics account, navigate to your “View”, select “Goals”, and “New Goal”:

Google Analytics New Goal

Under “Goal setup”, select “Custom”, then click “Continue”:

Custom Goal

Name your goal, leave “Goal slot ID” alone, select “Destination” for Type, then click Continue:

Goal Destination

For “Destination” choose “Begins with” and enter the path to your Thank You Page. Leave “Value” and “Funnel” off and click “Save”:

Goal Details

Great! Your goal is setup.

Step #4: Start A Google Experiment

It's now time to setup an “Experiment” in Google Analytics to test which landing page results in the best conversion rate.

In Google Analytics, click the “Reporting” tab, then “Behavior”, and “Experiments”:

Experiments

Click the “Create experiment” button.

Name your experiment, select the goal you just created, and select 100% of traffic to experiment.

Open the “Advanced Options” area and turn on “Distribute traffic evenly”, minimum of 2 weeks, and 95% confidence threshold.

Note: You don't have to select the settings I mentioned above if you'd prefer others. There are reasons to have different settings; however, if you're unsure why you'd want different settings … just follow what I've laid out.

Click “Next Step”:

New Google Experiment

Insert the URLs to the Original and Variant(s).

At this point, it doesn't matter which page you want to consider the “Original” – you could even rename them to Versions A & B if you want. However, on the next step, you'll have to add some extra code to whichever page you considered the “Original” – so, keep track.

Google Analytics will also pull in screenshots of your landing pages to help you verify you have entered the correct URLs.

Click “Next Step”:

New Google Experiment - 2

Select “Manually insert the code”, copy the code, and head back over to LeadPages to edit whichever page you told Google Experiments was the “Original”:

New Google Experiment - 3

Navigate to where you pasted the Google Analytics code (On the left hand side,  click the option for “SEO & Analytics”, then select the “Analytics” tab.)

Paste the Experiment code ABOVE the analytics code:

Add Google Experiment Code To LeadPages

Don't forget to save and update!

Go back to Google Analytics and “Review and start”. You'll want to validate your experiment code and get 2 check marks:

New Google Experiment - 4

If you don't see 2 check marks, Google Analytics will tell you why there's an issue. For example, “Can't find Experiment code” – in which case, you need to make sure the code is on your “Original” page and that you've both saved and updated the page.

Once you have 2 check marks, click “Start Experiment”:

New Google Experiment - 5

Step #5: Send Traffic!

Now that the experiment is setup, it's time to send tons of traffic to your “Original” landing page! (the one you told Google Experiments was your “Original” and the one you added the extra experiment code to.)

Google Analytics/Experiments will automatically send half your visitors to the “Original” page and half to the variation. (unless you selected different options during the setup, in which case, it'll spread traffic how you told it to)

Now sit back and collect data to see which one is the winner!

Experiment Results

As you can see in the example above, Variant 1 is performing 69.57% better than the original, awesome! Of course, the experiment isn't over yet because the statistical significance (probability of outperforming original) hasn't been met yet … but, it appears the new version is performing well!

Conclusion

This same split testing concept can be applied to more pages and platforms than just LeadPages!

For example, here's a video of the same concept being applied to OptimizePress.

Click here to learn how to build your own landing page platform with OptimizePress!

How To Split Test LeadPages Drag & Drop Page Builder2016-10-14T18:29:05+00:00

How To Build Your Own Landing Page Platform

Being able to develop beautiful, mobile responsive, high converting landing pages on the fly is a necessary part of online marketing.

There are a bunch of tools to help you do this; however, they tend to be overpriced, limited, overrated, and unnecessary.

In this step-by-step tutorial, I show you how to setup your own, self-hosted, landing page platform that you 100% own and control!

>> Click here to download this post in PDF format

BONUS!

I just turned this blog post into a free video course on YouTube and I also put together a part 2 that can be found here!

Comparison Chart

As previously stated, there are tons of landing page builders on the market and each one has its own list of benefits and features that make it “unique”; however, at the end of they day they all solve the same problem – help you easily create great looking pages.

Below you'll find a breakdown of the setup I'm about to show you compared to its closest competition.

Category This Setup LeadPages Instapage Unbounce
Annual Price $281.58 (*probably less) $297.00 $348.00 $588.00
# Visitors Unlimited Unlimited Unlimited 5,000
# Pages Unlimited Unlimited Unlimited Unlimited
Split Testing Yes, w/ Google Analytics Yes, w/ Google Analytics Yes, w/ Google Analytics Yes
Tracking Yes, w/ Google Analytics Sometimes Yes Yes
Secure Hosting (SSL) Yes Yes Yes No
Custom Domain/Branding Yes No No No
Digital Asset Delivery (Memberships) Yes (huge!) No No No

* Probably Less – 9 times out of 10, you likely have a host already and won't require a new one; if so,  you can subtract $164.58 from the price mentioned above, bringing the new annual price to $117.

** ALSO! – The renewal fee for OptimizePress drops from $97/yr to $39/yr after the first year – so, you can likely run this for less than $100/year!

Step #1: Domain, Hosting, and SSL

Domain

You'll want your self-hosted landing page platform on its own domain because you're going to streamline it for one thing and one thing only – building landing pages.

This way you don't accidentally bloat it with a bunch of unnecessary files and plugins that will slow down your site.

You want this baby fast!

When it comes to choosing a domain, I recommend something generic – especially if you'll have landing pages for different businesses, niches, or industries.

For example, I wouldn't want NathansGardening.com and then to create a landing page for fitness because this will cause inconsistencies; people will get confused.

I also recommend avoiding the words  “marketing” or “sales” (or anything similar) in the domain as it may “scare” some people off.

My top trick for picking a generic domain is to pick a word or name and attach “media” at the end.

For example:

  • crazyeyemedia.com
  • williamsmedia.com
  • framedmedia.com

Those could mean anything and aren't niche specific.

When it comes to registering your domain, I recommend NameCheap.

They offer a very clean domain registration process unlike GoDaddy that tries to up-sell you on a bunch of “protection” you don't need.

If you use NameCheap, I recommend checking out http://www.namecheapcoupons.com/ before you buy; they usually have a coupon that'll save ya a buck!

Anyway, the domain registration process is pretty straightforward and I think you can handle it without a bunch of pretty pictures. But, my one piece of advice is to NOT add anything to your domain (ie. protection, hosting, email, social boost, etc. [these are all crappy up-sells used to take advantage of people that don't know any better]). other than WhoisGuard.

I recommend WhoisGuard if you don't want people to know the physical address you used when you registered your domain. For example, your personal residence.

Hosting

You do not want to skimp on hosting. Having a slow website will hurt your conversions.

Being that the sole purpose of your landing page platform is to get conversions … we can't allow it to be slow!

If you're going to send between 0 and 2,500 people a day, the below setup will be great for you.

If you'll be sending more than that, you'll likely want to upgrade to a VPS or dedicated solution.

I recommend the Turbo package by a2Hosting.

Be sure to take note of the code at the bottom (ie. FLEET51). There's always a code for 51% off; however, it changes from time-to-time and they won't automatically apply it to your order … so, make sure you remember to add it!

hosting - 1 v2

When it asks you to “Choose a Domain…” select the option “I will use my existing domain and update my nameservers”

hosting - 2

  • Choose your Billing Cycle – I recommend at least 12 months.
  • Tick the box for a Dedicated IP.
  • Server Location – pick where most of your customers reside.
  • Priority Support – No.
  • Offsite Backups – No.
  • Performance Plus – Yes.
  • Barracuda Spam Firewall – No.
  • SSL Certificate – None.
  • Auto-Install Application – None.
  • CloudFlare Plan Plus Monthly – No (unchecked).

hosting - 3

Review your order – make sure the coupon's been applied!!! (again, they don't always add it automatically!!!)

Also, double check the Dedicated IP and Performance Plus.

hosting - 4

Complete your order and be on the lookout for an email that looks like this:

hosting - 5

The info you're looking for is the DNS Nameserver Information.

You're going to take this information and plug it into NameCheap (or whatever domain registrar you use).

Head back over to NameCheap with your nameserver information in hand, find the domain for your self-hosted landing page platform and select “Manage”.

Now, in the “NAMESERVERS” area, select Custom DNS and paste in the nameserver information from the email … and don't forget to hit the little check mark!

hosting - 6

Now, you'll have to wait until you start seeing an error message when you go to your domain.

Something like this:

hosting - 7

Sometimes this happens instantly, other times you have to wait a couple days.

But, once you see some form of error message as opposed to a “pretty” NameCheap page – you're ready to move on!

SSL

Once your hosting and domain are finally connected, it's time to secure your site.

Why do you want to secure your site with SSL?

A few reasons:

  1. People look for it and it makes your site more trustworthy
  2. Google likes it. Not that you're necessarily trying to get Google love for these pages, but if Google likes it, other places generally do too.
  3. So you can accept payments via Stripe (if you intend to do that) .

You can buy your SSL Certificate from NameCheap. You can pick any; however, I use and recommend RapidSSL.

Go through the checkout process (it's self-explanatory) and click “Activate”.

cPanel - SSL - 5

Now it's time to generate your CSR (Certificate Signing Request).

Start by logging into your cPanel and navigating to SSL/TSL Manager.

(The cPanel is part of your hosting service and is generally found at http://your-landing-page-domain.com:2082. If you're having trouble finding it, check the email your host sent you when you registered with them.)
cPanel - SSL

Click “Generate, view, or delete SSL certificate signing requests.”

cPanel - SSL - 2

Fill in the info it requests and click “Generate”.

cPanel - SSL - 3

Copy the “Encoded Certificate Signing Request”.

cPanel - SSL - 4

Go back to NameCheap and paste the code into the box that says “Enter CSR” and select your Server Type (probably Apache, Nginx, cPanel or other).

cPanel - SSL - 6

It'll ask you to verify the information, make sure it's correct and hit “Next”.

Now, we need to go back to cPanel and setup an email forwarder.

cPanel - SSL - 8

Make one forward from admin@your-landing-page-domain.com to youremail@yoursite.com.

cPanel - SSL - 9

Once the forwarder is setup, be sure to test it by sending an email to admin@your-landing-page-domain.com and ensure it's actually delivered. Sometimes it takes a few minutes for the forwarding to kick-in; you want to make sure it's working before moving to the next step.

Go back to NameCheap and select “Email” for DVC Method and admin@your-landing-page-domain.com for Approver Email.

cPanel - SSL - 7

It will request more information, fill it out. It's self-explanatory.

It will then ask you to confirm your information, click “Confirm”.

Wait for an email that looks like this and click the link the arrow is pointing to:

cPanel - SSL - 10

On the page it takes you to, click “I Approve”.

cPanel - SSL - 11v2

You will see a message about it being approved.

You will then receive another email that looks something like this:

cPanel - SSL - 12

NOTE: If you don't receive this email within an hour, contact support at https://www.rapidssl.com/. There's the option to “Chat” at the top – start a chat. There have been instances where they've needed to verify my ID on the phone before they could issue the certificate.  You may need to do that too, if you don't receive the email within the hour.

Assuming you receive the email, look for “—–BEGIN CERTIFICATE—-” and copy through it to the end “—–END CERTIFICATE—–”

cPanel - SSL - 13

Go back to your cPanel, back to “SSL, TSL Manager” and this time click on “Manage SSL sites.”

Browse for the Domain you're installing the SSL Cert on.

Paste in the code you just copied from your email.

A button that says “Autofill by Certificate” will magically appear. Click it and it will auto-populate everything else.

Tick “Enable SNI for Mail Services”

And finally, “Install Certificate”

cPanel - SSL - 15

You should see this …

cPanel - SSL - 16

YAY – your site is now secure!

>> Click here to download this post in PDF format

Step #2: WordPress and OptimizePress

Install WordPress

Go to your cPanel and locate the option for WordPress.

WordPress - 1

For Protocol, choose https://

Choose your Domain

In Directory, make it blank. (it's important that this be blank! You want your self-hosted landing page platform on the Root Domain.)

The rest of the info is pretty self explanatory; however, I recommend NOT activating any “special” plugins, themes, or options they offer as they tend to be sloppy and unnecessary. Go as bare bones as possible unless you have a specific reason to do otherwise.

WordPress - 2

After clicking “Install,” you'll have a beautiful, securely hosted, WordPress Website!

Get and Install OptimizePress

The first thing you need to do is purchase OptimizePress. It offers an outstanding page builder with a TON of features; it's the tool you'll be using.

Select your package. More than likely, you only need the Core Package.  You will only be running OptimizePress (OP) on this site that is dedicated to landing pages.

OptimizePress - 1

After purchase, you'll be able to enter the members' area where you can download the OptimizePress Theme. (Make sure you download the THEME, not just the plugin.)

OptimizePress - 2

Go back to your WordPress website and into the Admin Dashboard.

Navigate to Appearance, Themes, and Add New.

OptimizePress - 3

Click “Upload Theme”, browse to the OP Theme you just downloaded and select “Install Now”.

OptimizePress - 4

After install, click “Activate”.

You'll now have to input your API Key. Go back to the OP Members' Area and select “Licensing” in the navigation menu at the top.

Scroll down until you see “Registered API Keys” and copy one of them to your clipboard.

OptimizePress - 5

Go back to your site, paste your API key in the box, and click “Save settings”.

OptimizePress - 6


You'll land on something that looks like this:

OptimizePress - 7

Click “Blog Setup”.

This part doesn't matter too much because you won't be using this site as a blog. Remember, this is your landing page platform … it isn't your “site”.

So, you can select whatever makes you the happiest! (I typically select “Theme 1” and then just click “Continue to Step X” without changing any options … but, feel free to customize it the way you want.)

OptimizePress - 8

>> Click here to download this post in PDF format

Step #3: Speed Boost!

I've said it before and I'll say it again, speed is important!

Don't think speed is that important? Check out this infographic by Kissmetrics to see what only a 1 second delay does to your conversion rates!

Install Autoptimize

Autoptimize is a WordPress plugin that “squishes” your site, making it smaller, and thus – faster.

Login to your WordPress admin panel, navigate to Plugins, Add New, and search for “autoptimize”.

Autoptimize - 1

It should be the first result, if not scroll until you find it and click “Install Now”.

Autoptimize - 2

Make sure you click “Activate Plugin” after it's been installed.

Now, open up the Autoptimize Settings and turn on:

  • Optimize HTML Code
  • Optimize JavaScript Code
  • Optimize CSS Code

Then, click Save Changes and Empty Cache.

Autoptimize - 3

Check out the before and after!

Autoptimize - 4

The Load Time difference is negligible at .08s – I don't think the human eye could actually detect that; however, checkout “Page Size” and “Requests” – those numbers have nearly halved!

These size and request differences will make a massive impact on load time once you have a fair amount of traffic hitting the server.

So, while there's no real difference in speed right now, if a few hundred people are on the site at once … the Autoptimized site will outperform every time!

Install WP Smush – Image Optimization

Your source code, CSS, and JS have been “squished” … it's now time to “smush” your images!

Enter into your WordPress admin panel, navigate to Plugins, Add New, search for “wp smush”.  Then, Install and Activate it.

WP Smush

The nice part about this plugin … it basically comes out of the box ready to run!

More than likely you will want to “smush” the images you currently have.

Unless you upgraded to the paid version, you'll only be allowed to “smush” 50 images at a time.  If you're working with a new website, you won't likely have that many images to worry about; it should be a relatively painless process!

WP Smush - 2

Woo! Saved 6.4%!

WP Smush - 3

SUPER Boost With A CDN

Ok, this part is optional.  It will likely result in a few additional bucks per month; however, if you feel the need for speed, it's worth doing!

CDN stands for Content Delivery Network which is essentially a network of computers that delivers static files (images, scripts, css, etc.) very, very fast.

They're very fast because they perform based on geographic location and don't have to process (think) anything like your website server does … all they have to do is deliver what's already there. Hopefully that makes sense.

Anyway, we'll use Amazon's CloudFront CDN because it's fast and cheap.

The first thing you need to do is sign up for or into the Amazon Web Services Management Console.

Once you're in, you will come to a crazy screen like this:

CloudFront

Find CloudFront and select it.

Click “Create Distribution” and it will ask “Web” or “RTMP” – you want “Web”.

In the “Origin Domain Name” text box, enter your full URL (ie. https://your-landing-page-domain.com).

Press “tab”.

Everything will auto-populate.

The only change you need to make is with “Origin Protocol Policy” – change it to “Match Viewer”.

CloudFront - 2

Scroll all the way to the bottom and click “Create Distribution”.

You'll see a little spinny thing and it will take roughly 30 minutes to finish what it's doing.

Take a break. Go grab yourself some coffee or beer; come back in a little while!

CloudFront - 3

After the spinning stops, grab your CDN's link – ie. d3cc2joulgwu4z.cloudfront.net and head back over to your WordPress admin panel, go to Settings, Autoptimize, and find the CDN Base URL.

Enter your CDN's link, don't forget to add https:// and click Save Changes and Empty Cache.

CloudFront - 3.5

Now select “Plugins”, “Add New”, and search for “wp super cache” … then install and activate it.

CloudFront - 4v2

Ok, I'll be honest here – there are a lot of settings inside WP Super Cache that I don't quite understand … but, that's alright – because I know what works!

Find your way to the WP Super Cache Setting section and turn it on!

CloudFront - 5

Under the Advanced Tab, leave everything they way it is with the exception of ticking the “Don't cache pages for known users. (Recommended)” box. Be sure to click “Update Status”.

CloudFront - 6

Navigate to the CDN tab.

Enable CDN Support and paste in the URL of your CDN. Make sure you add the https:// to the beginning! (ie. https://d3cc2joulgwu4z.cloudfront.net).

Click “Save Changes”.

You're done!

If you feel brave, you can tick other boxes inside WP Super Cache; however, every time I do, things start to break.

Check out the load speeds now 😛

CloudFront - 8

>> Click here to download this post in PDF format

Membership, Digital Asset Delivery, and Taking Payments

This section is also optional; it only applies if you're wanting to take payments, run a membership portal, and/or deliver digital products.

NOTE: OptimizeMember is essentially the same thing as s2Member which means it's a really good membership plugin; however, it lacks one key feature when it comes to building funnels – the 1-click up-sell.

There are ways around this. For example, if you use ClickBank for your payment processor, you can do 1-click up-sells and it also offers built-in affiliate support – so, that's certainly an option.

You can also integrate with other platforms like SamCart, which add the 1-click up-sell functionality.

Finally, you may not even care about 1-click up-sells. You will still be able to offer One-Time-Offers (OTOs) and other up-sells … they just won't be 1-click!

I'm not going to show you how to build a membership site in this post as it's a separate topic … but, I'll get you pointed in the right direction.

Head over to your OptimizePress Members' Area, navigate to your downloads, and this time download OptimizeMember:

OptimizeMember - 1

Go back to your WordPress admin panel, navigate to Plugins, click Upload Plugin, and upload, install, and activate the OptimizeMember plugin you just downloaded.

After it's activated, you will see a warning message …

OptimizeMember - 2

BUT before we do what it says, go to Pages, Add New, call it “Join”, and click Publish.

OptimizeMember - 3

Now follow the directions presented in the warning message. Select the “Join” page you just created from the drop down menu.

OptimizeMember - 4

Okie dokie!

That's all for right now!

Summary

At this time, you should have an insanely badass, self-hosted landing page platform!

One that goes above and beyond the competition.

One that is 100% under your control!

One that can integrate seamlessly with a bunch of autoresponder tools to include my favorite, ActiveCampaign.

Not to mention, it comes with a top-notch membership portal that can accept payments, deliver assets, and make you money all in one place!

You can't beat it!

>> Click here to download this post in PDF format

Moving Forward

Ok. I showed you how to setup your own landing page platform in the most efficient way I know.

Now, you need to learn how to actually use it!

The good news is it's an easy tool to learn and far easier than LeadPages (I don't understand why so many people recommend that tool, but I digress).

Of course, the folks at OptimizePress want you to be successful with their tool, so they have a bunch of tutorials.

I've also created an OptimizePess mini-course that will show you how to build an opt-in funnel with two different squeeze pages, a split test, and a Facebook pixel.

Don't Forget Strategy!

Finally, having a badass platform and knowing how to “technically” do everything can't fix a poor strategy.

For this reason, I highly recommend you take my free sales funnel training series!

How To Build Your Own Landing Page Platform2020-04-04T14:44:26+00:00

2 Sales Page Formulas from Michel Fortin

Sales pages are an important part of your sales funnel … they handle most of the selling.

Of course, how you treat your leads up to that point plays a huge part as well, but the sales page is the final step. It needs to do a good job of handling final objections and creating a desire to buy or your sales funnel will suffer.

It's the exact point where a lead becomes a customer.

The thing about sales pages is that there are a lot of ways to approach them. There are short sales pages, looooong sales pages, video sales pages/letters (VSL), and everything in-between.

Depending on the product you're selling and the market you're selling to – the format of your sales page may change; however, the overall content wont.

People are still people and they all need to read/hear/see certain things in order to feel comfortable whipping out their credit card and purchasing your product.

By following proven sales page formulas, you'll be able to hit all the points that make people buy.

Credit Where Credit Is Due

I came across these 2 sales page formulas while listening to episode 36 of John McIntyre's podcast, “The McMethod Email Marketing Podcast”.

[iTunes] [site]

These formulas come from Michel Fortin, a very well known copywriter and Internet marketing strategist. He's been at it for the better part of 25 years and has a lot to offer. You can learn more about Michel at SuccessDoctor.com and Fortinize.com.

OATH Formula

The OATH Formula is essentially the starting point before you get into developing your sales page.

It's at this point where you figure out “where” your audience is in regards to the buying process.

Knowing “where” they are will help dictate the type of content you'll need to include and the length of your sales page.

Oblivious

They have no clue there is a problem, so they're definitely not looking for any solutions.

You have to educate them on the problem. Define what the problem is, show them that they're actually suffering from it, and how bad it really is.

Apathetic

They know they have some sort of problem, but they don't really care about solving it. You need to make their problem more urgent, bigger, and “blown up”.

The Problem-Agitate-Solve formula performs well here.

Thinking

They know they have a problem. They know there's a solution for it and they may even know your solution; however, they're just kind of thinking about it. They're not really “ready” to make the jump.

This is where you would need to add a sense of urgency whether through promotions or by really explaining why they need to solve this problem now.

For example:

  • Promotions: The course is closing in the next 72 hours, get in while you still can!
  • Why Now: Every cigarette you smoke today will shorten your life by 3 days. You need to stop now or die sooner than you should.

Hurting

Ideal scenario. People would purchase your product/service even if you only had a “Buy It Now” button on your site.

QUEST Formula

After using the OATH Formula to figure out “where” your audience is in the buying process, you can get to work on the development of your sales page.

Qualify

When people land on your sales letter, they should know instantly that “this is for them.”

Curiosity works well here, because if you're able to spark someone's curiosity, it's because there is some sort of interest.

Example:

Initial Headline: Do you have hair loss?

It's OK, but it doesn't spark any emotion or really call any attention to the pain/problem.

Final Headline: Suffering from hair loss?

Boom! I am suffering, this ad is for me! How can I stop suffering?!

Understand

Use empathy, talk about the problem – make sure that they know, that you know you understand their situation.

Tip

Call and interview people that have had success with your product or service and prod them to the point where they're selling you on why your product is so great. Capture their emotions before your product entered their life compared to afterwards.

Educate

Once the connection is formed from empathy and knowing that you understand their problem, it's time to educate them on the solution.

Educate on both the potential solutions and your own solution.

Stimulate

Explain why your solution is the best and start the ramp up to get them excited about purchasing your solution.

Transition

Transition the individual from a user or lead into a customer or client.

The Call-To-Action (CTA) or the close.

Questions To Ask Yourself

Here are a few question Michel asks his new clients when he's writing copy for them. They can help you get started in the right direction:

  • What are the 6 most common misconceptions about your product?
  • What are the 6 ways that clients tend to confuse you with your competitors?
  • What are the 6 biggest features of your product and their related benefits?
  • What are the 6 most common questions people ask about your product?
  • Who are your 6 best customers?

2 Sales Page Formulas from Michel Fortin2016-10-14T18:29:21+00:00

Landing Page Myths & Experiments

This is a guest post by Wes Towers. His mission is to empower a new breed of entrepreneurs with cutting-edge websites that attract more leads, graphic design that converts more sales, and systems that multiply results affordably and fast. He is also the owner of Omnific Design and author of: The Simple Manifesto – Marketing principles to save you time, increase profit and create your dream business in a SNAP!


Having a landing page that is professionally designed so it’s aesthetically pleasing and visually beautiful does not mean it will convert well.

As a graphic designer by training and now as a web designer, it pains me to say this but it’s true. I appreciate beautiful, creative design and all the design techniques I learnt at Uni, but I also understand the purpose is not to win design awards, but to win more business for the client. This is important for all website design and development, but it’s even more crucial for landing page design. General business websites may be for branding purposes, where they may not need to generate an immediate response. In these cases the visual appeal plays an important role; however, when it comes to landing pages, the primary purpose is to generate a response, typically to opt-in or buy immediately.

Landing Page Design

The common mistake clients make when briefing a designer for a landing page, is to focus on their own personal style preferences. A landing page is not a ‘branding’ exercise. While it’s important to feature your logo and use your visual branding elements in your business website, these are secondary for landing page design. Sure, there should be a level of consistency, maybe you use the fonts and colours from your brand; but then again, maybe it’s better to experiment with other options. Your logo doesn’t need to be featured at the top of a landing page. Your logo doesn’t need to be on the landing page at all. The key item that should hit you between the eyes is your core message, typically communicated by a strong headline.

When having a landing page designed, the style must be congruent with your offering more-so than your overall brand. For example, if you are selling a premium priced program, the design should have a premium feel. Likewise, if you are selling a quick and cheap “DIY” solution, the design should be suitable for that market. You might need to dirty up the design in this instance (something most designers hate to do). If you are selling “fast food” your website shouldn’t look like “fine-dining” and vice-versa. When your design is congruent with your offering, that’s when you will experience a higher conversion rate.

A/B Split Testing

All good marketing requires testing, measuring and tweaking so you can improve its performance. Landing pages are great for this process since there are limited variants, unlike your typical, multi-page website. Test different headlines, imagery, Calls-to-Action (CTA)… the list goes on.

Modelling

A/B split testing sounds like a long and cumbersome process of trial and error, right? There are ways to speed up the process. For instance, you don’t need to start from scratch; model from websites, particularly those in your niche. I know what you’re thinking – when I say model, I don’t mean directly copy a landing page (naughty you). Take a look at what others are doing successfully and make some educated guesses as to why they work. Leadpage.net has templates that you can sort by ‘conversion rate’. That’s a handy tool to see what’s working, even if you don’t sign up to Lead Pages. You can also check out Clickbank.com. They publish pages’ conversion rates for the benefit of affiliates who may want to promote these landing pages. We can use this information as a research tool to find what might work for our own landing pages.

Get Started

As I said before, with any landing page design, you’ll need to test, measure and tweak it to improve its performance. You will be making assumptions that may be incorrect. The trick is to get started and measure your assumptions, making further educated guesses as you go.

Here are a few quick and dirty tips to help get you started:

  • Present your main benefits in bullet-points, preferably using a font that stands out. You can use facts if they reinforce your message, but focus on the benefits for your ideal customers.
  • Use authentic, heartfelt video to communicate your offer. Videos on a landing page almost always increase conversion rates. Not at all surprising, since it’s easier to quickly communicate your message through video. Videos also give you the opportunity to build trust with customers by featuring a friendly person from your organization.
  • Make sure the headline and the rest of your content work together. There should only be one core message communicated on your landing page and everything should support that one message.
  • Only have one CTA per landing page. Having multiple CTAs on your landing page can confuse visitors, who will not know what to do first, and as a result end up doing nothing at all.
  • Don’t use links to any other website or webpage. There should only be one option for visitors to respond to, your CTA.
  • Don’t use social media sharing buttons on your landing page. Use them on a thank-you page when someone has just responded to your CTA. This will help spread the word about your offer without being a distraction featured on your landing page.
  • Include testimonials. Whether they are short videos or written quotes from happy customers, testimonials help visitors trust your business and, as a result, buy from you.
  • Increase the trust of the landing page by featuring partner logos and any other third-party endorsement relevant to your offer. The more, the better!
Landing Page Myths & Experiments2016-10-14T18:29:25+00:00

What are some key elements to increase newsletter sign ups on a landing page?

There are several key elements to help increase newsletter signups on a landing page … and there's kind of an order to their level of importance … so, I'll try and present them in that order.

Before I answer this question, NOTE … where your traffic is coming from and that quality of that traffic is the most important element to increasing signups. If you send garbage traffic, it'll never convert.

Assuming your traffic source is good, the first thing I'd look at is the Lead Magnet. If you're unfamiliar with that term – a Lead Magnet is an incentive for someone to give you their contact information … it “pulls the lead in.” For example, discounts, checklists, whitepapers, videos, ebooks, etc are common Lead Magnets.

Having said that – if no one wants your Lead Magnet, it wont matter how good the rest of your landing page is … it'll never convert well.

Here's a hint: Many times, just changing the title and/or the picture (aka “hero shot”) of your Lead Magnet without actually changing it's content can help increase conversion rates dramatically.

The second thing I'd look at is the Headline and, if you have one, the Sub-Headline. Maybe it needs to be shorter. Maybe it's not all that enticing.

Hint: Not that I condone this type of activity as it's costly to other people and businesses … but, sometimes it's one of those things. But, take a look at other people's landing pages … especially ones you're sent to through a paid advertisement … like on Facebook or Adwords. If people are businesses are paying money to send potential leads to a landing page … there is a decent chance that they're using … at least … slightly optimized Headlines and Sub-Headlines. Try and see what they say, find the pain points their using or try and identify any underlying formulas.

The third thing I'd look at is the opt-in form itself. What information are you requesting? Just the email address? Or, are you requesting first name, last name, telephone number, address, and their pet's name? The more fields your form has, the larger the barrier to entry. Only use fields you ABSOLUTELY NEED in order to start the relationship. Don't ever ask for personal information, just because. The simpler, the easier, the better.

The fourth thing I'd look at is the Call-To-Action (CTA) button. This is the “Submit” button for the opt-in form. I'd make sure it stands out (color, dimensions) and the wording matches the offer. For example, “Submit” is a bad CTA. Rarely do people want to “submit” something. BUT, they do want to “Download The Guide!”

Finally, I'd look at the overall look and feel. Is there one objective on the page or are you leading people in many different directions? For example, are you asking for contact information, but also asking for people to share the page? Or to look at some blog articles, or to do anything other than opt-in.

Each landing page should have one specific goal.

I hope that answers your question!

What are some key elements to increase newsletter sign ups on a landing page?2016-10-14T18:29:38+00:00

What are the best ways to increase a website’s conversion rate honestly?

I've actually answered this question before in a post entitled “How To Optimize Your Sales Funnel“.

Before I hop into what I'm about to say … first and foremost … you need to be offering something people actually want. If what your offering … no one cares about … the rest of this podcast is all a moot point.

Anyway, to answer your question – you need to first think of your website as a system.

It's not just “one thing” – there are many, many, many moving parts and they're all connected. If one part is broken, it's going to impact other parts.

At the beginning of your system (or your website) – you have your traffic source … which is arguably the most important aspect in regards to how well your site will convert.

If your traffic is bad … it does not matter how great the rest of your system is … no system in the world can turn garbage into gold.

So, traffic source is the first “best way” to increase your conversion rate.

The second best way is through optimizing your landing page. If you're unfamiliar with that term – a landing page is simply the page someone “lands” on after clicking through to your site … whether through an ad, a search result, a social share, or whatever.

If your landing page doesn't deliver clear guidance, have solid copy, etc. It's going to hurt your conversion rates and it will need changes.

So, that's what I would look at next.

Thirdly, if you don't have one already … you will want to have email autoresponder series in place. And, you'll want to ensure it's optimized as well.

Those are the three things … in that order (traffic, landing page, email series) … I recommend enhancing/optimizing as the “best” ways to increase a website's conversion rate.

What are the best ways to increase a website’s conversion rate honestly?2016-10-14T18:29:38+00:00